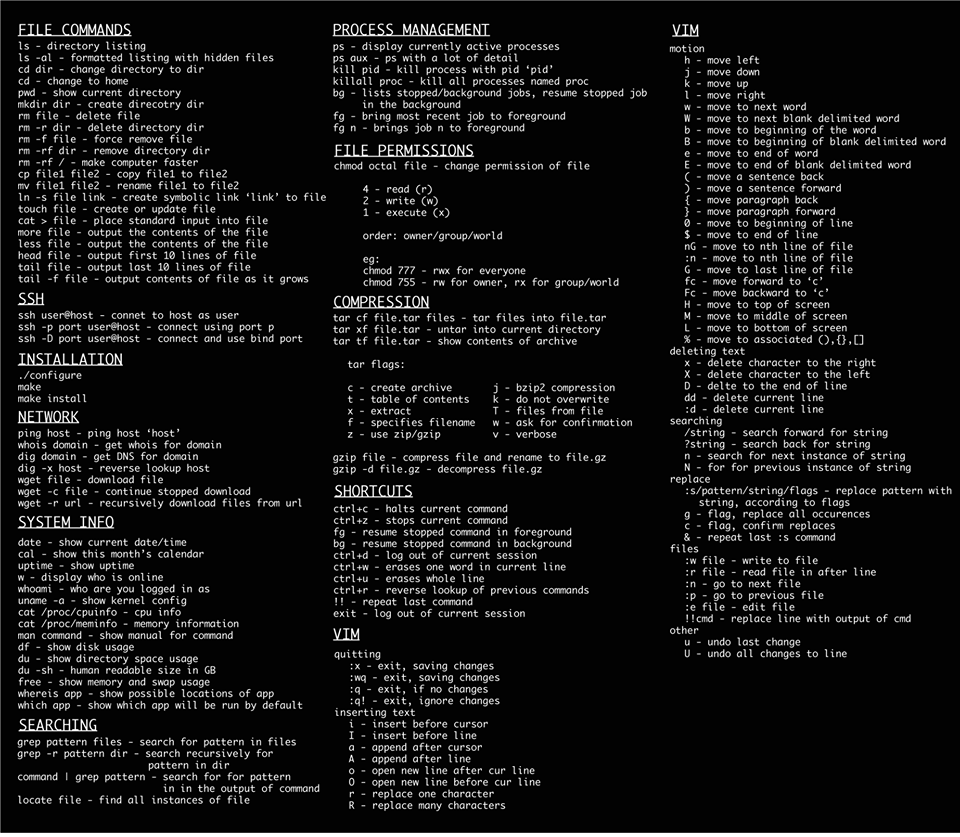
Topic List
Backup to remote server
Connect remove server via folder
sshfs username@example.com:/folder localfolder
Backup with rsync
rsync -trv /folder/src/ /folder/dest/
Backup with copy
cp -R /folder/src /folder/dest &

ตรวจสอบ OS version
cat /etc/os-release
ขั้นตอน 1: Update เวอร์ชั่นปัจจุบันของ Ubuntu
***
sudo apt update && apt upgrade -y
ขั้นตอน 2: เตรียมสำหรับการ upgrade:
***
sudo apt install update-manager-core
ขั้นตอน 3: Run the Upgrade:
***
sudo do-release-upgrade
***
ขั้นตอน 4: Post-Upgrade Cleanup:
***
sudo apt autoremove && apt clean
ขั้นตอน 5: ตรวจสอบผลการอัพเกรด: ***
cat /etc/os-release
***
หากเกิดความผิดพลาด สามารถเปลี่ยน sources แล้ว update
First, ensure that all the contents of /etc/apt/sources.list and /etc/apt/sources.list.d/ubuntu.sources contain the word noble instead of jammy. If it contains jammy, replace that with noble.
sudo cp /etc/apt/sources.list /etc/apt/sources.list.bak
sudo sed -i 's/jammy/noble/g' /etc/apt/sources.list
sudo sed -i 's/jammy/noble/g' /etc/apt/sources.list.d/ubuntu.sources
sudo apt update
sudo apt full-upgrade
หลังจาก upgrade แล้ว start apache ไม่ได้ เนื่องจากมีการเปลี่ยน php version ให้สร้างลิงก์ไฟล์ของ apache config ใหม่
cd /etc/apache2/mods-enable
ln -s php8.1.conf ../mods-avaliable/php8.1.conf
ln -s php8.1.load ../mods-avaliable/php8.1.load
แล้ว restart apache
systemctl restart apache2
Upgrade MariaDB
apt upgrade mariadb-server
apt install mariadb-server
มีโจทย์ว่าต้องการเพิ่ม user ใน Ubuntu แต่จำกัดไม่ให้เปลี่ยน folder หรือ ไม่ให้เข้าถึงบาง folder ซึ่งตามปกติบน Linux จะจัดการสิทธิได้ 3 ระดับ คือ เจ้าของ/กลุ่ม/คนอื่นๆ โดยไม่สามารถจัดการเฉพาะ user ได้
จึงจำเป็นต้องใช้โปรแกรมสำหรับจัดการสิทธิเพิ่มเติม ในที่นี้จะใช้ setfacl : set file access control lists - Linux
1.ยกเลิกการเข้าถึง folder
setfacl -m user:username:--- folder/
2.อื่น ประมาณเช่น
setfacl -R -m g:username:rwx /home/user1/domains/xxx.com/folder/
setfacl -m u:username:--x /home/user1/domains/xxx.com/
setfacl -R -x user:username /home/user1/domains/xxx.com/folder/
setfacl -m u:username:--x /home/user1/domains
setfacl -m u:username:--x /home/user1
3.ขอดูสิทธิ
getfacl folder
ติดตั้ง Server ใหม่ของ Ubuntu Server เขียนบันทึกคำสั่งไว้สักหน่อย
Apache Installation
sudo apt update
sudo apt upgrade

sudo apt install apache2 -y
systemctl status apache2

sudo a2dismod ssl
sudo a2enmod ssl
sudo a2enmod rewrite
Apache config
sudo nano /etc/apache2/sites-available/000-default.conf
เพิ่ม AllowOverride Al
<Directory /home/>
        Options Indexes FollowSymLinks
        Options FollowSymLinks
        AllowOverride All
        Order allow,deny
        allow from all
        Require all granted
</Directory>
sudo apt-get install mariadb-server mariadb-client systemctl status mariadbsudo nano /etc/mysql/conf.d/mysqld.cnf sudo systemctl restart mysql
debian : service mysqld restart
กรณีที่ติดตั้ง mariadb แล้วไม่ได้กำหนดรหัสของ root
mysql --versionsystemctl stop mariadb systemctl set-environment MYSQLD_OPTS="--skip-grant-tables --skip-networking" systemctl start mariadb mysql -u root
mysql> FLUSH PRIVILEGES; mysql> SET PASSWORD FOR 'root'@localhost = PASSWORD("newpassword"); mysql> quit
sudo systemctl unset-environment MYSQLD_OPTS sudo systemctl restart mariadb
mysql -u root -p
mysql> CREATE USER 'newuser'@'localhost' IDENTIFIED BY 'password'; mysql> GRANT ALL PRIVILEGES ON * . * TO 'newuser'@'localhost';
#MySql Config
ตรวจสอบว่าควรกำหนดค่า keybuffersize สักเท่าไหร่ดี
SELECT CONCAT(ROUND(KBS/POWER(1024,
    -> IF(PowerOf1024<0,0,IF(PowerOf1024>3,0,PowerOf1024)))+0.4999),
    -> SUBSTR(' KMG',IF(PowerOf1024<0,0,
    -> IF(PowerOf1024>3,0,PowerOf1024))+1,1))
    -> recommendedkeybuffersize FROM
    -> (SELECT LEAST(POWER(2,32),KBS1) KBS
    -> FROM (SELECT SUM(indexlength) KBS1
    -> FROM informationschema.tables
    -> WHERE engine='MyISAM' AND
    -> tableschema NOT IN ('information_schema','mysql')) AA ) A,
    -> (SELECT 2 PowerOf1024) B;
name /etc/my.cnf
 <a class="hashtag" href="/tags/MyISAM">#MyISAM</a>
key_buffer_size=4096M
join_buffer_size=256K  # from 140M for row pointers
thread_cache_size=40  # from 8 to avoid thread starvation
query_cache_limit=8M  # from 4M since you have QC turned OFF
key_cache_age_threshold=7200  # from 300 seconds to reduce key_reads RPS
key_cache_division_limit=50  # from 100 percent for HOT/WARM caches
key_cache_block_size=16K  # from 1K to evict bigger block when full
open_files_limit=30000  # from 1024 to reduce opened_files RPS
table_open_cache=10000  # from 407 to reduce opened_tables RPS
table_definition_cache=2000  # from 603 to reduce opened_table_definitions RPS
max_heap_table_size=48M  # from 32M  for additional capacity
tmp_table_size=48M  # from 32M to reduce created_tmp_disk_tables count
innodb_io_capacity=1600  # from 200 to allow more IOPS
read_rnd_buffer_size=192K  # from 256K to reduce handler_read_rnd_next RPS
sort_buffer_size=2M  # from 256K to reduce sort_merge_passes count

 <a class="hashtag" href="/tags/Innodb">#Innodb</a>
<a class="hashtag" href="/tags/innodb">#innodb</a>_buffer_pool_size = 6144M
innodb_log_file_size = 512M
innodb_lru_scan_depth=100  # from 1024 to reduce CPU busy every SE$

max_connections = 500
key_buffer_size = 512M
ติดตั้ง PHP => How to install PHP 7.4 on Ubuntu 22.04 LTS Jammy Linux
sudo apt update && sudo apt upgrade
sudo apt install software-properties-common
sudo add-apt-repository ppa:ondrej/php -y

sudo apt install php7.4
sudo apt install php7.4-{cli,common,curl,zip,gd,mysql,xml,mbstring,json,intl}

sudo update-alternatives --config php
sudo apt-get install php7.4 php7.4-mysql php-common php7.4-cli php7.4-json php7.4-common php7.4-opcache libapache2-mod-php7.4

sudo nano /etc/php/7.4/fpm/php.ini

sudo systemctl restart apache2
sudo systemctl restart mysql

wget -r --ask-password ftp://user:example.com/
Install phpMyAdmin
sudo apt install phpmyadmin php-mbstring php-zip php-gd php-json php-curl
Mount volumn จาก server เดิม มาไว้ใน server ใหม่ เพื่อทำการ copy file
sudo apt install sshfs

mkdir folder
sshfs -p 22 username@example.com:/home/folder/ folder
ใช้งานเสร็จก็ un mount
umount folder
Configuration
ที่มา
- How to install LAMP stack web server on Ubuntu 20.04
- How To Create a New User and Grant Permissions in MySQL
- How to recursively download a folder via FTP on Linux
- How can I disable and enable SSL in Apache
- How To Reset Your MySQL or MariaDB Root Password on Ubuntu 18.04
- How to enable mod_rewrite in apache ubuntu
- How to install PHP 7.4 on Ubuntu 22.04 LTS Jammy Linux
แปะไว้ก่อน ค่อยมาเขียนรายละเอียดนะครับ
sudo nano /etc/php/7.4/fpm/php.ini sudo systemctl restart apache2sudo nano /etc/mysql/conf.d/mysqld.cnf sudo systemctl restart mysql
mkdir remotefolder sshfs -p 22 username@example.com:/home/folder/ remotefolder umount remotefolder
sshfs -p 22 username@example.com:/home/user/domains/example.com/public_html/ remotefolder nohup rsync -trv remotefolder/path/ path/ &
sudo apt update<br /> sudo apt upgrade
sudo apt install apache2 -y systemctl status apache2
sudo a2dismod ssl sudo a2enmod ssl<br /> <br /> <br />
apt install php7.4 php7.4-mysql php-common php7.4-cli php7.4-json php7.4-common php7.4-opcache libapache2-mod-php7.4
apt install mariadb-server mariadb-client systemctl status mariadb
mysql> CREATE USER 'newuser'@'localhost' IDENTIFIED BY 'password'; mysql> GRANT ALL PRIVILEGES ON * . * TO 'newuser'@'localhost';<br /> <br /> <br />
sudo systemctl restart apache2<br /> sudo systemctl restart mysql<br /> <br /> <br /> wget -r --ask-password ftp://user:server.com/
- https://upcloud.com/community/tutorials/installing-lamp-stack-ubuntu/?utmterm=&utmcampaign=DSA&utmsource=adwords&utmmedium=ppc&hsaacc=9391663435&hsacam=7185608860&hsagrp=81739862313&hsaad=391197952986&hsasrc=g&hsatgt=dsa-460992423274&hsakw=&hsamt=b&hsanet=adwords&hsaver=3&gclid=CjwKCAiAeb-BRB2EiwAGBnXXuae-7ru2jsgSAiku6bX0k7XucjvKLGBQkSm-DKo92SXjG1odKAeRoCid0QAvD_BwE - https://www.digitalocean.com/community/tutorials/how-to-create-a-new-user-and-grant-permissions-in-mysql - https://stackoverflow.com/questions/113886/how-to-recursively-download-a-folder-via-ftp-on-linux - https://askubuntu.com/questions/709594/how-can-i-disable-and-enable-ssl-in-apache-without-a-command-if-possible
ชีวิตหวนกลับมาหา Linux : Ubuntu อีกครั้งหลังส่ง MacBook ไปเข้าโรงซ่อมเป็นครั้งที่ 2 พร้อมกับการรอคอยการกลับมาอีกประมาณ 3 สัปดาห์ (รวมความแล้ว 1 ปีกว่า ๆ ไม่ได้ใช้งานเครื่องเกือบ 2 เดือน)
จึงต้องหวนกลับมาหาคำสั่ง Linux อีกครั้ง
แต่ชีวิตก็มีความสุขดี
Pre-Flight Check
- These instructions are intended specifically for adding a user on Ubuntu 14.04 LTS.
- I’ll be working from a Liquid Web Core Managed Ubuntu 14.04 LTS server, and I’ll be logged in as root.
Step 1: Add the User
It’s just one simple command to add a user. In this case, we’re adding a user called mynewuser :
adduser mynewuser
First you will be prompted to enter the user’s password (twice); do this step. Next you’ll be prompted to enter in the user’s information. This step is not required, and pressing enter fills the field with the default information:
Adding user `mynewuser’ …
Adding new group `mynewuser’ (1001) …
Adding new user `mynewuser’ (1001) with group `mynewuser’ …
Creating home directory `/home/mynewuser’ …
Copying files from `/etc/skel’ …
Enter new UNIX password:
Retype new UNIX password:
passwd: password updated successfully
Changing the user information for mynewuser
Enter the new value, or press ENTER for the default
Full Name []: User
Room Number []:
Work Phone []:
Home Phone []:
Other []:
When prompted with the following question, enter Y then hit enter to continue.
Is the information correct? [Y/n] Y
Step 2: Grant Root Privileges to the User
visudo
Find the following code:
# User privilege specification
root ALL=(ALL:ALL) ALL
In this case, we’re granting root privileges to the user mynewuser . Add the following below that code:
mynewuser ALL=(ALL:ALL) ALL
Then exit and save the file with the key commands Ctrl-x, Y, enter.
If you’ve followed the instruction above correctly, then you should now have a user setup by the name of mynewuser which can use sudo to run commands as root!
ที่มา How to Add a User and Grant Root Privileges on Ubuntu 14.04
เก็บไว้ก่อน เดี๋ยวค่อยมาแปลและเขียนใหม่นะครับ
This article contains a brief introduction to set up an FTP-Server under Debian Linux. Activation of an FTP server should be done similarly with other distributions of Linux. Debian 5.0 (x86) was used as the test system.
Contents
- Installation of the required proftpd Package
- Adjusting the Configuration
- Anonymous FTP
- Re-loading the Configuration and Re-starting the FTP Server
- Links
Installation of the required proftpd Package
ProFTPd FTP-Server was used for this introduction because of its simply installation and configuration.
apt-get install proftpd
If the package cannot be found, update the local list of packages using:
apt-get update
If the package still cannot be installed after that, check the /etc/apt/sources.list on the appropriate Debian mirror server. You will find more information about this in the article Debian Mirror.
Indicate in the subsequent inquiry whether the FTP server should act as a standalone server (standalone) or as a service of inetd. In this example, the standalone option has been selected. Adjusting the Configuration
Our configuration assumes that we will login using system users found in the ftpuser group.
In order to adjust the configuration to your needs, edit the /etc/proftpd/proftpd.conf file.
If you are not using IPv6, this feature should be deactivated first:
UseIPv6 off
After that, we will add the following instruction at the end of the file:
<Global>
    RequireValidShell off
</Global>

DefaultRoot ~ ftpuser

<Limit LOGIN>
    DenyGroup !ftpuser
</Limit>
What do the instructions mean?
As a first step, we told ProFTPd that users wanting to login do not need a shell. Afterwards, we instructed ProFTPd to lock users in their home directory using DefaultRoot. Finally, we specified that only those users who are members of the ftpuser group could login.
We will now restart our FTP server so that our configuration takes effect:
/etc/init.d/proftpd restart
Then, we will create the ftpuser group and a first user that will be able to login.
addgroup ftpuser
Now, we create the user:
adduser ftpbenutzer -shell /bin/false -home /var/www
Finally, we assign the user to the ftpuser group:
adduser ftpbenutzer ftpuser
That’s everything. You should now be able to login with the user via FTP.
You have to run sudo deluser username groupname to delete a user from it's corresponding group. And run this sudo deluser --group groupname command to delete a group.
Anonymous FTP
By adding the following section to the etc/proftpd/proftpd.conf file, you will also give anonymous users (read) access to the FTP area:
.
.
.
<Anonymous ~ftp>
  User                          ftp
  Group                         nogroup
  # We want clients to be able to login with "anonymous" as well as "ftp"
  UserAlias                     anonymous ftp
  # Cosmetic changes, all files belong to ftp user
  DirFakeUser   on ftp
  DirFakeGroup on ftp

  RequireValidShell             off

  # Limit the maximum number of anonymous logins
  MaxClients                    10

  # We want 'welcome.msg' displayed at login, and '.message' displayed
  # in each newly chdired directory.
  DisplayLogin                  welcome.msg
  DisplayFirstChdir             .message

  # Limit WRITE everywhere in the anonymous chroot
  <Directory *>
    <Limit WRITE>
      DenyAll
    </Limit>
  </Directory>

#   # Uncomment this if you're brave.
#   # <Directory incoming>
#   #   # Umask 022 is a good standard umask to prevent new files and dirs
#   #   # (second parm) from being group and world writable.
#   #   Umask                           022  022
#   #            <Limit READ WRITE>
#   #            DenyAll
#   #            </Limit>
#   #            <Limit STOR>
#   #            AllowAll
#   #            </Limit>
#   # </Directory>

</Anonymous>
.
.
.
To make sure, that user "ftp" is able to login anonymously to ftp-space, you have to add the user to the group "ftpuser":
adduser ftp ftpuser
Re-loading the Configuration and Re-starting the FTP Server
The configuration will have to be re-loaded after the adjustments to the /etc/proftpd/proftpd.conf file:
/etc/init.d/proftpd reload
Because the FTP server will be stopped when re-loading the configuration, it will also have to be re-started afterwards:
/etc/init.d/proftpd start
Links
- http://www.proftpd.org/ - Web site for the project
- http://www.castaglia.org/proftpd/ - Web site for the primary developer with numerous HOWTO pages and background information
วันนี้เกิดเหตุ wintesla2003.com หยุดทำงาน โชคดีที่สั่ง reboot ผ่าน DA แล้วสามารถเข้าใช้ ssh ได้ (หลังจากที่เข้า ssh ไม่ได้มาเป็นปี ก็ยังงงอยู่ว่ามันเข้าได้ยังไง โชคดีก็คือไม่ต้องวิ่งไปที่ IDC)
หลังจาก reboot ก็ยังใช้งานไม่ได้ ขณะกำลังหาสาเหตุ ก็นึกได้ว่า server นี้เคยมีปัญหากับ MySql มาครั้งนึงแล้ว คือ partition ที่เก็บข้อมูลเต็ม พอลอง df ดูก็ปรากฎว่าเต็มอีกแล้วจริง ๆ ด้วย
หลังจากลองย้ายบาง folder ออกไป ก็สามารถใช้งานได้ แต่มีบางตารางเสียหาย เลยสั่ง repair ปรากฎว่าเดี้ยงอีก เต็มอีกเหมือนเดิม
เลยตัดสินใจ "ย้ายบ้าน MySql ไปไว้อีก partition"
คำสั่ง
cd /home
mkdir mysql
chown mysql:mysql mysql
cd mysql

perl -pi -e 's/mysqld=ON/mysqld=OFF/' /usr/local/directadmin/data/admin/services.status
/sbin/service mysqld stop

cp -Rp /var/lib/mysql/* .
cd /var/lib
mv mysql mysql_old
ln -s /home/mysql ./mysql

/sbin/service mysqld start
perl -pi -e 's/mysqld=OFF/mysqld=ON/' /usr/local/directadmin/data/admin/services.status

<a class="hashtag" href="/tags/once">#once</a> satisfied that mysqld is running and functioning correctly, remove the old data:

rm -rf mysql_old
ประมาณนี้ (แต่ผมไม่ได้ทำตามนี้เป๊ะ ๆ) คือ ย้ายข้อมูลไปไว้ใน /home แล้วทำ link จาก /var/lib/mysql ให้ชี้ไปที่ /home/mysql
ที่มา directadmin.com
หลายวันที่ผ่านมาสังเกตุพบว่าเครื่องอืด ๆๆ ไฟฮาร์ดดิส ก็ ติด ๆ ดับ ๆ ตลอด ส่วนใหญ่จะติดตลอดเวลา แถม top - wa ขึ้น 30-40% ตลอด ก็งงว่า process อะไรวะที่กำลังเขียนฮาร์ดดิส เลยลองหาโปรแกรมเพื่อมาดูการใช้งาน I/O บน Ubuntu ซะหน่อย ว่าเกิดอะไรขึ้น
โปรแกรมที่ใช้ดูก็มี
- iotop
- atop
- cat /proc/[PID]/io
- pidstat
ดูจาก atop พบว่า gvfs- มันทำงานตลอด กิน I/O เยอะมาก น่าจะตัวนี้แหละ
kill ซะเลย
ชงัดนัก รอดูผล - ปกติด รอดูอีกครั้งหลัง reboot - ???