Topic List
Update OS
sudo apt update
sudo apt upgrade
Mount harddisk
Using /dev/disk/by-uuid/:
- Open a terminal.
- Type blkid or ls -l /dev/disk/by-uuid/ and press Enter.
- This will display a list of symlinks, where the filename is the UUID and the target is the device it points to (e.g., lrwxrwxrwx 1 root root 10 Jul 12 12:00 1234-5678 -> ../../sda1).
- Identify the UUID you need and then use the corresponding device path (e.g., /dev/sda1) in other commands if needed.
Edit file /etc/fstab
/dev/disk/by-uuid/50046676-d3fb-6183-54e4-7d65cd58e8ad /mount_name ext4 defaults 0 1
Then update new fstab with command ???
Check harddisk problem
Check with
Repair withfsck /dev/sdax
fsck /dev/sdax -y
Create new user
Ubuntu create user account commandsMake user to sudoersudo adduser <username>
Make user sshsudo adduser <username> sudo
Setup ssh to login with password
ที่มา How to change the SSH port nano etc/ssh/sshd_config or nano /etc/ssh/sshd_config.d/60-cloudimg-settings.conf Change value to yesPort 22 ... PasswordAuthentication yes
###Generate an SSH Key Run command in localsudo ufw allow 22/tcp sudo ufw reload sudo service ssh restart sudo systemctl status sshd ss -tuln | grep [new_port_number]
Check current services runningssh-keygen -t ed25519 ssh-copy-id -p 22 username@your_server_ip ssh username@your_server_ip
sudo service --status-all
Step 1 – Installing the Nginx Web Server
Install nginx lastest version from nginx server
nginx: Linux packagesImport an official nginx signing key so apt could verify the packages authenticity. Fetch the key:sudo apt install curl gnupg2 ca-certificates lsb-release ubuntu-keyring
curl https://nginx.org/keys/nginx_signing.key | gpg --dearmor \
    | sudo tee /usr/share/keyrings/nginx-archive-keyring.gpg >/dev/null
The output should contain the full fingerprint 573BFD6B3D8FBC641079A6ABABF5BD827BD9BF62 as follows:gpg --dry-run --quiet --no-keyring --import --import-options import-show /usr/share/keyrings/nginx-archive-keyring.gpg
 [expires: 2027-05-24]
      573BFD6B3D8FBC641079A6ABABF5BD827BD9BF62
uid                      nginx signing key <signing-key@nginx.com>
echo "deb [signed-by=/usr/share/keyrings/nginx-archive-keyring.gpg] \
https://nginx.org/packages/ubuntu `lsb_release -cs` nginx" \
    | sudo tee /etc/apt/sources.list.d/nginx.list
echo "deb [signed-by=/usr/share/keyrings/nginx-archive-keyring.gpg] \
https://nginx.org/packages/mainline/ubuntu `lsb_release -cs` nginx" \
    | sudo tee /etc/apt/sources.list.d/nginx.list
echo -e "Package: *\nPin: origin nginx.org\nPin: release o=nginx\nPin-Priority: 900\n" \
    | sudo tee /etc/apt/preferences.d/99nginx
sudo apt update
sudo apt install nginx

nginx -version

sudo service nginx start
sudo ufw allow 80
Install nginx current version from Ubuntu repo
Test nginx configsudo apt install nginx
Restart nginxsudo nginx -t
sudo systemctl restart nginx
sudo systemctl reload nginx
sudo service nginx restart
sudo service nginx reload
sudo nano /etc/nginx/sites-available/your_domain
Enable HTTP/2 in Nginx on Ubuntu
http2 on;
listen 443 ssl;
listen [::]:443 ssl ipv6only=on;
Step 2 – Installing MariaDB to Manage Site Data
Install MariaDB lastest version from MariaDB server
More informationHere are the commands to run to import the MariaDB repository key on your Ubuntu system:
sudo apt-get install apt-transport-https curl
sudo mkdir -p /etc/apt/keyrings
sudo curl -o /etc/apt/keyrings/mariadb-keyring.pgp 'https://mariadb.org/mariadbreleasesigning_key.pgp'
Once the key is imported, copy and paste the following into a file under /etc/apt/sources.list.d (for instance /etc/apt/sources.list.d/mariadb.sources):
# MariaDB 12.3 repository list - created 2026-03-06 08:09 UTC
# https://mariadb.org/download/
X-Repolib-Name: MariaDB
Types: deb
# deb.mariadb.org is a dynamic mirror if your preferred mirror goes offline. See https://mariadb.org/mirrorbits/ for details.
# URIs: https://deb.mariadb.org/12.rc/ubuntu
URIs: https://mirror.kku.ac.th/mariadb/repo/12.3/ubuntu
Suites: questing
Components: main main/debug
Signed-By: /etc/apt/keyrings/mariadb-keyring.pgp
You can now install MariaDB 12.3 from the MariaDB repository with:
sudo apt-get update
sudo apt-get install mariadb-server
Debug symbol packages, those that end in a '-dbgsym' suffix, are harmless to install. They are typically used to resolve stack traces and provide detail of perf recordings. They do not change the running behaviour of MariaDB. If in doubt, omit from installation.
If you need source packages, replace Types: deb with Types: deb deb-src in the /etc/apt/sources.list.d/mariadb.sources file. Then, you can obtain the mariadb source after installing dpkg-dev package, with apt-get source mariadb-server.
If you prefer to use the old "one-line-style" APT format, create the file /etc/apt/sources.list.d/mariadb.list with the following:
# MariaDB 12.3 repository list - created 2026-03-06 08:09 UTC
# https://mariadb.org/download/
# deb.mariadb.org is a dynamic mirror if your preferred mirror goes offline. See https://mariadb.org/mirrorbits/ for details.
# deb [signed-by=/etc/apt/keyrings/mariadb-keyring.pgp] https://deb.mariadb.org/12.3/ubuntu questing main
deb [signed-by=/etc/apt/keyrings/mariadb-keyring.pgp] https://mirror.kku.ac.th/mariadb/repo/12.3/ubuntu questing main
# deb-src [signed-by=/etc/apt/keyrings/mariadb-keyring.pgp] https://mirror.kku.ac.th/mariadb/repo/12.3/ubuntu questing main
See Installing MariaDB packages for more information.
Or install from Ubuntu repo (maybe not lastest version)
sudo apt install mariadb-server
sudo mysql_secure_installation
    Switch to unix_socket authentication [Y/n] n
Create user
sudo mysql mysql> ALTER USER 'root'@'localhost' IDENTIFIED WITH mysqlnativepassword BY 'password'; mysql> FLUSH PRIVILEGES;mysql> CREATE USER 'newuser'@'localhost' IDENTIFIED BY 'strongpassword'; mysql> GRANT ALL PRIVILEGES ON . TO 'username'@'localhost' WITH GRANT OPTION; mysql> FLUSH PRIVILEGES;
mysql> SHOW GRANTS FOR 'username'@'localhost';
Change data folder
Warning: Changing the location for a MySQL server is an administrative task which is not officially supported by Plesk. The solution should be applied on your risk. As an alternative to moving the MySQL data directory to another location, consider mounting a partition from a new disk to the default MySQL data directory location /var/lib/mysql/ Create a backup of /etc/my.cnf(CentOS/RHEL) or /etc/mysql/my.cnf(Debian/Ubuntu)
Copy or move all files from /var/lib/mysql to the desired directory and set the permissions:# cp /etc/my.cnf /etc/my.cnf.backup
# cp -pr /var/lib/mysql /data/mysql
Update /etc/my.cnf or /etc/mysql/my.cnf(Debian/Ubuntu) using vi text editor and change the location to where you have copied mysql directory:# chown -R mysql:mysql /data/mysql
datadir=/data/mysql Note: Be sure that the path to socket mysql.sock is unchanged in my.cnf and it is /var/lib/mysql. Also the directory /var/lib/mysql itself should present on the server as changing the path to the socket can cause the Plesk to crush. Create a configuration file:# vi /etc/my.cnf
Add necessary content into the created file:# touch /etc/systemd/system/mariadb.service.d/mariadb_custom.conf
# echo "[Service]" >> /etc/systemd/system/mariadb.service.d/mariadb_custom.conf
Create a backup of /etc/passwd:# echo "ProtectHome=false" >> /etc/systemd/system/mariadb.service.d/mariadb_custom.conf
Modify the string below in /etc/passwd and set up the new MySQL location: mysql:x:27:27:MariaDB Server:/data/mysql:/sbin/nologin Restart mysqld: Debian/Ubuntu:# cp -a /etc/passwd /etc/passwd.backup
CentOS:# service mysqld restart
Update /etc/psa/psa.conf with a path to the new mysql directory: MYSQLVARD /data/mysql In case of Ubuntu 16.04, disable mysql in apparmor: Modify file /etc/apparmor.d/usr.sbin.mysqld (create it if it doesn't exist using vi editor), add: /usr/sbin/mysqld { }# service mariadb restart
# rm /etc/apparmor.d/disable/usr.sbin.mysqld
# apparmor_parser -a /etc/apparmor.d/usr.sbin.mysqld
For CentOS/RHEL, SELinux context should be changed or it should be disabled.# aa-disable /etc/apparmor.d/usr.sbin.mysqld
ปรับแต่ง config
nano /etc/mysql/mariadb.conf.d/50-server.cnf
[mysqld]
log_slow_query_file    = /var/log/mysql/mariadb-slow.log
log_slow_query_time    = 2
...
innodb_buffer_pool_size = 256M
innodb_log_file_size = 128M
ตรวจสอบตารางว่า crash หรือไม่
mariadb-check -u user -p -c database
Backup and restore data
Common mysqldump Commands Backup a single database:
Backup specific tables:mysqldump -u [username] -p [database_name] > [backup_name.sql]
Backup all databases:mysqldump -u [username] -p [database_name] [table1] [table2] > [tables_backup.sql]
Backup only the structure (no data):mysqldump -u [username] -p --all-databases > [all_databases.sql]
Backup and compress (requires gzip):mysqldump -u [username] -p --no-data [database_name] > [structure.sql]
Restore database:mysqldump -u [username] -p [database_name] | gzip > [backup_name.sql.gz]
mysql -u [username] -p
mysql> use database_name
mysql> source \folder\backup_name.sql
Step 3 – Installing PHP and Configuring Nginx to Use the PHP Processor => รายละเอียด
sudo apt-get purge php7.*
sudo apt purge php8.*
sudo apt-get autoclean
sudo apt-get autoremove
Install php 8.5
sudo add-apt-repository ppa:ondrej/nginx
sudo add-apt-repository ppa:ondrej/php
sudo apt update && sudo apt-get install ca-certificates apt-transport-https software-properties-common
sudo apt install php8.5-fpm
php -v
php --modules
apt install -y php8.5-common php8.5-fpm php8.5-mysql php8.5-zip php8.5-gd php8.5-mbstring php8.5-cli php8.5-curl php8.5-xml php8.5-bcmath
Install php 8.3
sudo add-apt-repository ppa:ondrej/nginx
sudo apt update && sudo apt-get install ca-certificates apt-transport-https software-properties-common
sudo apt install php8.3-fpm
php -v
php --modules
apt install -y php8.3-common php8.3-fpm php8.3-mysql php8.3-redis php8.3-mongodb php8.3-zip php8.3-gd php8.3-mbstring php8.3-cli php8.3-curl php8.3-xml php8.3-bcmath
หากเกิด error permission denied โดยดูจาก nginx error.log
sudo tail -30 /var/log/nginx/error.log
วิธีแก้ปัญา The socket permissions look correct, but still failing. Let's diagnose further: 1. Check what user nginx runs as:connect() to unix:/run/php/php8.5-fpm.sock failed (13: Permission denied) while connecting to upstream, client: 171.7.216.140, server: softgang.app, request: "GET /info.php HTTP/2.0", upstream: "fastcgi://unix:/run/php/php8.5-fpm.sock:", host: "softgang.app"
If it's nginx user (not www-data), that's the problem. Add nginx to www-data group:ps aux | grep nginx
The issue was the nginx user didn't have permissions to access the socket owned by www-data. Adding nginx to the www-data group solved it.sudo usermod -a -G www-data nginx sudo systemctl restart nginx
This is a common gotcha when nginx and PHP-FPM run as different users. Your PHP app should now be working properly! 2. Verify PHP-FPM is actually listening:
Should show it's listening. If not, restart it:sudo lsof | grep php8.5-fpm.sock
3. Check for SELinux/AppArmor issues:sudo systemctl restart php8.5-fpm sudo systemctl status php8.5-fpm
If SELinux is enabled:sudo aa-status # Check AppArmor getenforce # Check SELinux
4. Double-check nginx error log again:sudo semanage fcontext -a -t httpd_var_run_t "/run/php/php8.5-fpm.sock" sudo restorecon -v /run/php/php8.5-fpm.sock
5. Test PHP-FPM directly:sudo tail -20 /var/log/nginx/error.log
6. Also verify your nginx upstream is correct in config:sudo -u www-data php -v
Should be exactly: server unix:/run/php/php8.5-fpm.sock; ####ปรับ config PHP ####เปลี่ยนค่า session.gc\_probability, date.timezone, post_max_size, upload\_max\_filesizegrep -A2 "upstream" /etc/nginx/sites-enabled/your-site.conf
nano /etc/php/8.3/fpm/php.ini
####แก้ไขค่า php poolsession.gc_probability = 1 date.timezone = Asia/Bangkok post_max_size = 64M upload_max_filesize = 64M
nano /etc/php/8.3/fpm/pool.d/www.conf
Enabling PHP8.3 on Nginx serverpm = dynamic pm.max_children = 600 pm.start_servers = 20 pm.min_spare_servers = 10 pm.max_spare_servers = 30 request_terminate_timeout = 30s pm.max_requests = 500
sudo nano /etc/nginx/sites-available/default
index index.php index.html
...
location ~ \.php$ {
        include snippets/fastcgi-php.conf
        # With php-fpm (or other unix sockets):
        fastcgi_pass unix:/var/run/php/php8.3-fpm.sock;
        # With php-cgi (or other tcp sockets):
        <a class="hashtag" href="/tags/fastcgi">#fastcgi</a>_pass 127.0.0.1:9000;
}
Restart nginxsudo service php8.3-fpm restart
sudo systemctl restart nginx.service
Install phpmyadmin
apt install phpmyadmin
sudo ln -s /usr/share/phpmyadmin /var/www/your_domain/phpmyadmin
Create site config
cd /etc/nginx/sites-available
nano domain.conf
cd /etc/nginx/sites-enabled
ln -s ../sites-available/domain.conf domain.conf
Step 4 - How To Secure Nginx with Let's Encrypt on Ubuntu 22.04
sudo apt remove certbot
sudo snap install core; sudo snap refresh core
sudo snap install --classic certbot
sudo ln -s /snap/bin/certbot /usr/bin/certbot
sudo certbot
กรณีมีปัญหาในการติดตั้งผ่าน snap ไม่ได้ สามารถติดตั้งโดยตรงได้จาก Certbot Instructions
ติดตั้ง SSL Certificate Filde วิธีการติดตั้ง SSL Certificate บน Nginx Server
Step 5 – ขั้นตอนสุดทัาย - Check List
config PHP
Then changesudo nano /etc/php/8.3/fpm/php.ini
Then restart phpdate.timezone = Asia/Bangkok
sudo service php8.3-fpm restart
It sets the maximum allowed size of the client request body, specified in the “Content-Length” request header field. Here’s an example of increasing the limit to 50MB in /etc/nginx/nginx.conf file. Set in http block which affects all server blocks (virtual hosts).
nano /etc/nginx/nginx.conf
http {
    ...
    client_max_body_size 50M;
}
nano /etc/nginx/sites-available/domain.conf
server {
    ...
    client_max_body_size 50M;
}
location /uploads {
    ...
    client_max_body_size 50M;
}<br />
systemctl restart nginx
Old version
ถอนการติดตั้ง
หากมีการติดตั้ง apache2 ไว้ก่อน สามารถถอนการติดตั้งด้วย
apt-get purge apache2
apt-get autoremove
กรณีการอัพเกรดจาก Apache มีขั้นตอนของการตรวจสอบ และ ถอดโปรแกรม
uname -a
Linux alumni 5.4.0-167-generic <a class="hashtag" href="/tags/184">#184</a>-Ubuntu SMP Tue Oct 31 09:21:49 UTC 2023 x86_64 x86_64 x86_64 GNU/Linux

lsb_release -a
No LSB modules are available.
Distributor ID: Ubuntu
Description:    Ubuntu 20.04.1 LTS
Release:    20.04

apachectl -v
Server version: Apache/2.4.41 (Ubuntu)
Server built:   2023-10-26T13:54:09

php -v
PHP 7.4.3-4ubuntu2.20 (cli) (built: Feb 21 2024 13:54:34) ( NTS )
Copyright (c) The PHP Group
Zend Engine v3.4.0, Copyright (c) Zend Technologies
    with Zend OPcache v7.4.3-4ubuntu2.20, Copyright (c), by Zend Technologies

mysql --version
mysql  Ver 15.1 Distrib 10.3.39-MariaDB, for debian-linux-gnu (x86_64) using readline 5.2

<a class="hashtag" href="/tags/apt">#apt</a> update
<a class="hashtag" href="/tags/apt">#apt</a> list --upgradable<br />
<br />
<br />
add-apt-repository ppa:ondrej/apache2
apt update
apt upgrade

do-release-upgrade

ssh recovery port 1022
server {
    ...
    listen 443 ssl; # managed by manual
    ssl_certificate    /etc/ssl/certs/filename.crt;
    ssl_certificate_key    /etc/ssl/certs/filename.key;
    # ssl_certificate_chain /etc/ssl/filename.chain
}
sudo add-apt-repository universe
sudo apt install php-fpm php-mysql
sudo apt install php8.1-mbstring
sudo apt install php8.1-gd

php --version
which php
whereis php
sudo nano /etc/nginx/sites-available/your_domain
/etc/nginx/sites-available/your_domain
server {
        listen 80;
        root /var/www/html;
        index index.php index.html index.htm index.nginx-debian.html;
        servername yourdomain;

    location / {
           try_files $uri $uri/ /index.php?$uri&$args;
           # try_files $uri $uri/ =404;
    }

    location ~ \.php$ {
            include snippets/fastcgi-php.conf;
            fastcgi_pass unix:/var/run/php/php7.2-fpm.sock;
    }

    location ~ /\.ht {
            deny all;
    }


}
ที่มา
กำลังเปลี่ยน Class MyDb() ของเดิมเป็น Class SoftganzDB() ของใหม่ และเปลี่ยนมาใช้ PDO แทน mysqli
ที่มา
เดิมเคยเก็บโดยการแปลงด้วยคำสั่ง jsonencode แต่มักจะเกิดปัญหาเมื่อมีอักขระบางตัวหรือการขึ้นบรรทัดใหม่ ซึ่งจะทำให้ไม่สามารถแปลงกลับด้วยคำสั่ง jsondecode
แต่....
MySQL version 5.7.8 ได้เพิ่ม JSON data type ให้แล้ว (แม้ว่าเมื่อเลือกเป็น JSON data type แล้ว MySQL ก็จะเก็บเป็น longtext type ก็ตาม)
และมีคำสั่งเฉพาะในการจัดการกับข้อมูล เช่น
JSONOBJECT,
JSONARRAY,
JSONMERGEPRESERVE,
 JSONMERGEPATCH,
 JSONTYPE,
 JSONEXTRACT,
 JSONINSERT,
 JSONREPLACE,
 JSONSET,
 JSONREMOVE
JSON-SET:
UPDATEiotSETdataJson= JSON-SET(dataJson, "$.test", "1" ) WHEREnodeDataId=3
JSON-REPLACE จะบันทึกค่าทับของเดิม แต่หากของเดิมไม่เคยมี key นั้นอยู่ ก็จะไม่มีการบันทึกข้อมูลใหม่ลงไป
JSON-SET จะบันทึกข้อมูลทับของเดิม หากยังไม่เคยมี key นั้นอยู่ ก็จะสร้างเพิ่มให้โดยอัตโนมัติ
ลองดูรายละเอียดได้จาก How To Work with JSON in MySQL
ที่มา
เดี๋ยวค่อยมาเขียนรายละเอียด
Install Apache
Location of Apache config file is /opt/homebrew/etc/httpd/httpd.conf Change www home folder
mv /opt/homebrew/var/www /opt/homebrew/var/www.bak
ln -s /Users/httpdocs /opt/homebrew/var/www
brew services restart apache2
brew tap shivammathur/php
เลือกมาสักเวอร์ชั่น
brew install shivammathur/php/php@5.6
brew install shivammathur/php/php@7.0
brew install shivammathur/php/php@7.1
brew install shivammathur/php/php@7.2
brew install shivammathur/php/php@7.3
brew install shivammathur/php/php@7.4
brew install shivammathur/php/php@8.0
brew install shivammathur/php/php@8.1
brew install shivammathur/php/php@8.2
Mac M1 : Config file อยู่ที่
/opt/homebrew/etc/php/7.0/php.ini
/opt/homebrew/etc/php/7.1/php.ini
/opt/homebrew/etc/php/7.2/php.ini
/opt/homebrew/etc/php/7.3/php.ini
/opt/homebrew/etc/php/7.4/php.ini
/opt/homebrew/etc/php/8.0/php.ini
/opt/homebrew/etc/php/8.1/php.ini
/opt/homebrew/etc/php/8.2/php.ini
Mac Intel : Config file อยู่ที่
/usr/local/etc/php/5.6/php.ini
/usr/local/etc/php/7.0/php.ini
/usr/local/etc/php/7.1/php.ini
/usr/local/etc/php/7.2/php.ini
/usr/local/etc/php/7.3/php.ini
/usr/local/etc/php/7.4/php.ini
/usr/local/etc/php/8.0/php.ini
ผลลัพท์ตอนติดตั้ง
To enable PHP in Apache add the following to httpd.conf and restart Apache:
    LoadModule php7_module /usr/local/opt/php@7.4/lib/httpd/modules/libphp7.so

<FilesMatch .php$>
    SetHandler application/x-httpd-php
</FilesMatch>


Finally, check DirectoryIndex includes index.php
    DirectoryIndex index.php index.html

The php.ini and php-fpm.ini file can be found in:
    /usr/local/etc/php/7.4/

php@7.4 is keg-only, which means it was not symlinked into /usr/local,
because this is an alternate version of another formula.

If you need to have php@7.4 first in your PATH, run:
  echo 'export PATH="/usr/local/opt/php@7.4/bin:$PATH"' >> ~/.zshrc
  echo 'export PATH="/usr/local/opt/php@7.4/sbin:$PATH"' >> ~/.zshrc

For compilers to find php@7.4 you may need to set:
  export LDFLAGS="-L/usr/local/opt/php@7.4/lib"
  export CPPFLAGS="-I/usr/local/opt/php@7.4/include"<br />
<br />
<br />
To start shivammathur/php/php@7.4:
  brew services start shivammathur/php/php@7.4
Or, if you don't want/need a background service you can just run:
  /usr/local/opt/php@7.4/sbin/php-fpm --nodaemonize
เปลี่ยนลิงก์
brew unlink php && brew link --overwrite --force php@7.4
Apache
แก้ไขไฟล์ /opt/homebrew/etc/httpd/httpd.conf /etc/apache2/httpd.conf หรือ /usr/local/etc/httpd/httpd.conf file scroll to the bottom of the LoadModule entries.
 LoadModule php5_module /usr/local/opt/php@5.6/lib/httpd/modules/libphp5.so
 <a class="hashtag" href="/tags/LoadModule">#LoadModule</a> php7_module /usr/local/opt/php@7.0/lib/httpd/modules/libphp7.so
 <a class="hashtag" href="/tags/LoadModule">#LoadModule</a> php7_module /usr/local/opt/php@7.1/lib/httpd/modules/libphp7.so
 <a class="hashtag" href="/tags/LoadModule">#LoadModule</a> php7_module /usr/local/opt/php@7.2/lib/httpd/modules/libphp7.so
 <a class="hashtag" href="/tags/LoadModule">#LoadModule</a> php7_module /usr/local/opt/php@7.3/lib/httpd/modules/libphp7.so
 <a class="hashtag" href="/tags/LoadModule">#LoadModule</a> php7_module /usr/local/opt/php@7.4/lib/httpd/modules/libphp7.so
 <a class="hashtag" href="/tags/LoadModule">#LoadModule</a> php_module /usr/local/opt/php@8.0/lib/httpd/modules/libphp.so
 <a class="hashtag" href="/tags/LoadModule">#LoadModule</a> php_module /usr/local/opt/php@8.1/lib/httpd/modules/libphp.so
ใช้ sphp เป็นตัวเปลี่ยน version จะสะดวกกว่า
curl -L https://gist.githubusercontent.com/rhukster/f4c04f1bf59e0b74e335ee5d186a98e2/raw/adc8c149876bff14a33e3ac351588fdbe8172c07/sphp.sh > /opt/homebrew/bin/sphp
chmod +x /opt/homebrew/bin/sphp
sphp 8.1
Install MariaDB
brew install mariadb
Restart MariaDB
Auto start
brew services start mariadb
Manual start
mysql.server restart
Location of database is /opt/homebrew/var/mysql, If you want to change use symbolic link to new location
brew services stop mariadb
cp -R /opt/homebrew/var/mysql /Users/mysql
mv /opt/homebrew/var/mysql /opt/homebrew/var/mysql.bak
mkdir /opt/homebrew/var/mysql
ln -s /Users/mysql /opt/homebrew/var/mysql
brew services start mariadb
MariaDB Configuration
แก้ไขไฟล์ /opt/homebrew/etc/my.cnf.d/my.cnf
[mysqld]
sqlmode="NOFIELDOPTIONS"
  # Avaliable Mode<br />
  # "NOFIELDOPTIONS,IGORESPACE,NOZEROINDATE,NOZERODATE,ERRORFORDIVISIONBYZERO,NOAUTOCREATEUSER,NOENGINESUBSTITUTION"
default-storage-engine = MYISAM
character-set-server = utf8
  <a class="hashtag" href="/tags/collation">#collation</a>-server = utf32unicodeci
หากไม่ต้องการให้ตรวจสอบการบันทึกข้อมูลของฟิลด์ เช่น ข้อมูลยาวเกินกว่าที่กำหนดในฟิลด์ ให้กำหนด mode เป็น NOFIELDOPTIONS
ที่มา
ติดตั้ง Server ใหม่ของ Ubuntu Server เขียนบันทึกคำสั่งไว้สักหน่อย
Apache Installation
sudo apt update
sudo apt upgrade

sudo apt install apache2 -y
systemctl status apache2

sudo a2dismod ssl
sudo a2enmod ssl
sudo a2enmod rewrite
Apache config
sudo nano /etc/apache2/sites-available/000-default.conf
เพิ่ม AllowOverride Al
<Directory /home/>
        Options Indexes FollowSymLinks
        Options FollowSymLinks
        AllowOverride All
        Order allow,deny
        allow from all
        Require all granted
</Directory>
sudo apt-get install mariadb-server mariadb-client systemctl status mariadbsudo nano /etc/mysql/conf.d/mysqld.cnf sudo systemctl restart mysql
debian : service mysqld restart
กรณีที่ติดตั้ง mariadb แล้วไม่ได้กำหนดรหัสของ root
mysql --versionsystemctl stop mariadb systemctl set-environment MYSQLD_OPTS="--skip-grant-tables --skip-networking" systemctl start mariadb mysql -u root
mysql> FLUSH PRIVILEGES; mysql> SET PASSWORD FOR 'root'@localhost = PASSWORD("newpassword"); mysql> quit
sudo systemctl unset-environment MYSQLD_OPTS sudo systemctl restart mariadb
mysql -u root -p
mysql> CREATE USER 'newuser'@'localhost' IDENTIFIED BY 'password'; mysql> GRANT ALL PRIVILEGES ON * . * TO 'newuser'@'localhost';
#MySql Config
ตรวจสอบว่าควรกำหนดค่า keybuffersize สักเท่าไหร่ดี
SELECT CONCAT(ROUND(KBS/POWER(1024,
    -> IF(PowerOf1024<0,0,IF(PowerOf1024>3,0,PowerOf1024)))+0.4999),
    -> SUBSTR(' KMG',IF(PowerOf1024<0,0,
    -> IF(PowerOf1024>3,0,PowerOf1024))+1,1))
    -> recommendedkeybuffersize FROM
    -> (SELECT LEAST(POWER(2,32),KBS1) KBS
    -> FROM (SELECT SUM(indexlength) KBS1
    -> FROM informationschema.tables
    -> WHERE engine='MyISAM' AND
    -> tableschema NOT IN ('information_schema','mysql')) AA ) A,
    -> (SELECT 2 PowerOf1024) B;
name /etc/my.cnf
 <a class="hashtag" href="/tags/MyISAM">#MyISAM</a>
key_buffer_size=4096M
join_buffer_size=256K  # from 140M for row pointers
thread_cache_size=40  # from 8 to avoid thread starvation
query_cache_limit=8M  # from 4M since you have QC turned OFF
key_cache_age_threshold=7200  # from 300 seconds to reduce key_reads RPS
key_cache_division_limit=50  # from 100 percent for HOT/WARM caches
key_cache_block_size=16K  # from 1K to evict bigger block when full
open_files_limit=30000  # from 1024 to reduce opened_files RPS
table_open_cache=10000  # from 407 to reduce opened_tables RPS
table_definition_cache=2000  # from 603 to reduce opened_table_definitions RPS
max_heap_table_size=48M  # from 32M  for additional capacity
tmp_table_size=48M  # from 32M to reduce created_tmp_disk_tables count
innodb_io_capacity=1600  # from 200 to allow more IOPS
read_rnd_buffer_size=192K  # from 256K to reduce handler_read_rnd_next RPS
sort_buffer_size=2M  # from 256K to reduce sort_merge_passes count

 <a class="hashtag" href="/tags/Innodb">#Innodb</a>
<a class="hashtag" href="/tags/innodb">#innodb</a>_buffer_pool_size = 6144M
innodb_log_file_size = 512M
innodb_lru_scan_depth=100  # from 1024 to reduce CPU busy every SE$

max_connections = 500
key_buffer_size = 512M
ติดตั้ง PHP => How to install PHP 7.4 on Ubuntu 22.04 LTS Jammy Linux
sudo apt update && sudo apt upgrade
sudo apt install software-properties-common
sudo add-apt-repository ppa:ondrej/php -y

sudo apt install php7.4
sudo apt install php7.4-{cli,common,curl,zip,gd,mysql,xml,mbstring,json,intl}

sudo update-alternatives --config php
sudo apt-get install php7.4 php7.4-mysql php-common php7.4-cli php7.4-json php7.4-common php7.4-opcache libapache2-mod-php7.4

sudo nano /etc/php/7.4/fpm/php.ini

sudo systemctl restart apache2
sudo systemctl restart mysql

wget -r --ask-password ftp://user:example.com/
Install phpMyAdmin
sudo apt install phpmyadmin php-mbstring php-zip php-gd php-json php-curl
Mount volumn จาก server เดิม มาไว้ใน server ใหม่ เพื่อทำการ copy file
sudo apt install sshfs

mkdir folder
sshfs -p 22 username@example.com:/home/folder/ folder
ใช้งานเสร็จก็ un mount
umount folder
Configuration
ที่มา
- How to install LAMP stack web server on Ubuntu 20.04
- How To Create a New User and Grant Permissions in MySQL
- How to recursively download a folder via FTP on Linux
- How can I disable and enable SSL in Apache
- How To Reset Your MySQL or MariaDB Root Password on Ubuntu 18.04
- How to enable mod_rewrite in apache ubuntu
- How to install PHP 7.4 on Ubuntu 22.04 LTS Jammy Linux
งมหาเรื่องแปลกอยู่หลายอาทิตย์ วันนี้เลยตามหาว่าเกิดอะไรขึ้นกับโปรแกรม PHP ที่เขียนบน Linux และไม่เคยทดสอบบน Windows เมื่อเอามาติดตั้งก็เลยเกิด error แปลก
ปรากฏว่า คำสั่ง isset($body['location']) ดันเป็นจริงเมื่อ $body ไม่ใช่ array ทำให้เช็คเงื่อนไขผิดพลาด
แก้ไข : ตรวจสอบด้วยว่าเป็น array หรือไม่
if ( is_array($body) && isset($body['location']) ) then ;Do something
กำลังศึกษาเรื่อง Model View Control (MVC) หลังจากที่เคยอ่านเรื่องนี้มานานเป็นปี ๆ แล้ว และได้นำมาประยุกต์ใช้นิดหน่อย แต่ยังไม่เข้าใจอย่างลึกซึ้ง เลยขอมานั่งทำความเข้าใจอย่างละเอียดอีกสักรอบ หลังจากนี้ก็จะพยายามรวบรวมเรื่องราวของ Model View Control มาเก็บไว้เรื่อย ๆ
เริ่มกันที่แนวคิดของ MVC ก่อนนะครับ
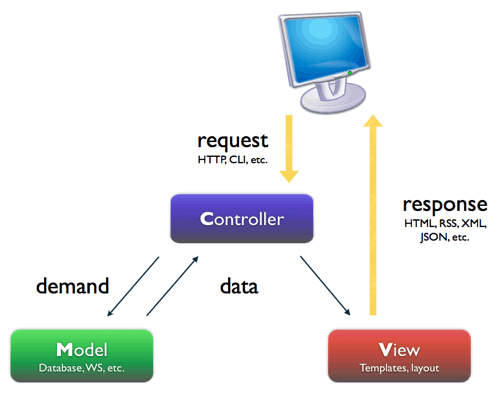
ในยุคนี้คงไม่มีทางที่เราจะหนีคำนี้ได้พ้นเพราะในการพัฒนาระบบในปัจจุบันขนาดของโครงการจะใหญ่ขึ้นเรื่อยๆ เนื่องจากความต้องการมีสูงขึ้นเรื่อยๆ ดังนั้นการจะพัฒนา software ด้วยตัวคนเดียวเป็นเรื่องยาก จึงมีการประยุกต์ใช้งาน Enterpirse Architecture Pattern อย่าง MVC กันมากขึ้นในทุกๆ platform ด้วยเหตุนี้การจะใช้งาน MVC Framework ตัวใดก็แล้วแต่ไม่ว่าจะเป็น PHP , .NET หรือ Java ล้วนแล้วแต่ต้องอาศัยแนวความคิดที่ถูกต้องจึงจะเป็นประโยชน์อย่างแท้จริงไม่เช่นนั้นนอกจากจะไม่มีประโยชน์ใดๆ ในการใช้ Framework แล้ว ยังเป็นดภาระในการแก้ไขซึ่งจะทำให้แก้ไขได้ยากกว่าปกติ ดังนั้นจึงเริ่มจากการแนะนำแนวคิดในการแบ่งแยกส่วนของ code ออกเป็น 3 ส่วนด้วยกันคือ

MVC Archtecture Pattern
Model (M) เป็นส่วนของ Business Logic และ ส่วนของ Entity ซึ่งส่วนนี้จะแตกต่างจากแนวคิดแบบ 3-tier ซึ่งจะแยกส่วนล่างสุดเป็น Data Access Layer (DAL) ซึ่งจะทำหน้าที่ติดต่อกับ Database เท่านั้น แต่ Model จะไม่ได้เป็นเพียงแครการติดต่อกับ Database เท่านั้น แต่ยังรวมเรื่องของ Business Logic ต่างด้วย เช่น การคำนวน VAT 7% หรือการคำนวนค่าต่างให้อยู่ในชั้นนี้ และถ้าจะให้ดีชั้นนี้ควรจะทำการสร้าง Service Layer ขึ้นมา ตรงนี้จะลงรายละเอียดในบทความถัดไป
View (V) เป็นส่วนของการแสดงผลอันนี้ตรงตัวไม่ต้องคิดมาก เป็นส่วนของ HTML ,CSS และ JavaScript ในการทำ Web Application แต่ถ้าเป็น Windows Application ก็จะเป็นพวก forms ต่างๆ ในการใช้งาน PHP Framework บางตัวจะพ่วงเอา Template Engine มาให้ใช้งานด้วย เช่น Symfony จะมี Twig เป็น Template Engine ซึ่งข้อดีของการใช้งาน Template Engine ก็คือจะทำการแยกส่วนของการแสดงผลกับ logic ได้ชัดเจนมากขึ้นคนที่ทำ HTML CSS และ JavaScript ไม่จำเป็นต้องเขียน PHP ได้
Controller (C) ส่วนนี้เป็นส่วนสมองของระบบจะทำหน้าที่คอยควบคุมว่าจะดึงข้อมูลจากไหน (Model ตัวไหน) แล้วก็ไปแสดงผลยังไง (View ตัวไหน) ส่วนนี้จะเป็นส่วนที่่ผิดกันเป็นประจำสำหรับผู้ที่เริ่มใช้งาน MVC Framework เพราะเป็นส่วนที่เราไม่เคยแยกส่วนนี้มาก่อน ส่วนของ Controller จะเป็น work flow หรือขั้นตอนการทำงานต่างๆ (มีเฉพาะ flow ของการทำงานเท่านั้น) จะไม่มี logic ใดๆในนี้ไม่มีการเขียน HTML ไม่มีการคำนวนค่าต่างๆ หน่าที่ของ Controller มีเพียงแค่รับค่ามาทำการ Validate แล้วส่งเข้าไปที่ Model เท่านั้น
ประโยชน์ของการใช้ MVC ก็คือการเพิ่ม maintainability หรือทำให้ระบบแก้ไขได้ง่ายขึ้นเพราะมันแยกส่วนออกจากกันอย่างชัดเจน อีกข้อนึงที่สำคัญไม่แพ้กันก็คือเราจะสามารถแยกคนทำงานตามสิ่งที่เค้าถนัด เช่น คนทำ View ไม่ต้องรู้ว่า database มีโครงสร้างยังไง คนที่ทำผั่ง model ก็ไม่ต้องมากังวลเรื่องของการแสดงผล แต่ขอให้ตกลงเรื่องของ data ที่ส่งหากันให้ดีก็พอ
สุดท้ายอาจไม่จำเป็นจะต้อง strict อยู่ในรูปแบบนี้ 100% เพราะนี่เป็นเพียงทฤษฏี แต่ยังไงก็ตามถ้าจะเขียนผิดไปจากนี้ (anti pattern) ก็สามารถทำได้แต่ต้องแน่ใจว่าการทำแบบนั้นมีเหตุผลมากพอที่จะทำ และไม่กระทบกับการแก้ไขในอนาคต
ที่มา : www.irobust.co.th
เหตุเกิดจากว่า server ที่วางอยู่ใน ม.อ. ไม่อนุญาตให้ FTP จากภายนอกมหาวิทยาลัยได้ ต้องเข้าไปนั่งในมหาวิทยาลัยเท่านั้นจึงจะใช้งาน FTP ได้
แต่เว็บที่ดูแลอยู่มีปัญหาแค่ว่า folder สำหรับ upload ไฟล์นั้นได้ถูกกำหนด permission ไว้ที่ 755 ทำให้ไม่สามารถบันทึกภาพไว้ได้
นั่งคิดอยู่หลายตลบว่าจะทำยังไงดี ไม่อยากบึ่งรถไป ม.อ. ก็มาคิดได้ว่า CMS ที่เขียนไว้นั้น สามารถ run PHP ได้ และ PHP ก็มี function ftp และ ftp_chmod
ทางแก้จึงออกมาประมาณนี้
<?php
$ftp_server = "my.ftp.com";
$ftp_user_name = "myftpusername";
$ftp_user_pass = "myfppassword";

$conn_id = ftp_connect($ftp_server);
$login_result = ftp_login($conn_id, $ftp_user_name, $ftp_user_pass);

$folder="folder/to/chmod";

if (ftp_chmod($conn_id, 0777, $folder) !== false) {
 echo "$folder chmoded successfully to 777\n";
} else {
 echo "could not chmod $folder\n";
}

ftp_close($conn_id);
?>
มีโครงการที่จะปรับปรุงการเข้ารหัสผ่าน อ่านดูแล้ว นี่ Understanding Hash Functions and Keeping Passwords Safe ก็เป็นวิธีหนึ่ง ที่น่าจะโอเค
ไว้จะลองดูอีกที
ได้ข้อมูลมาจาก PHP: ระบบสมาชิก - สมัครสมาชิก
การใช้ Regular Expression ใน PHP - คำว่า Regular expressions ดูเหมือนจะเป็นคำที่น่ากลัวเอามาก ๆ สำหรับนักโปรแกรมมือใหม่ หลายคนไม่อยากรู้จักมันเลยเสียด้วยซ้ำ แต่ขอบอกว่า จริง ๆ แล้วมันไม่ยากแล้วก็มีประโยชน์มากด้วย ไม่ว่าจะเป็น JavaScript หรือ Perl ต่างก็ใช้กันทั้งนั้น จึงไม่เสียหาย ถ้าจะทำความรู้จักกับมันไว้บ้าง
Regular expression เป็นการกำหนดรูปแบบเพื่อการค้นหาข้อความหรือตัวอักษรว่า มีอยู่ในข้อความที่กำหนดหรือไม่ เช่น เราอยากรู้ว่า ข้อความที่มีคนกรอกแบบฟอร์มเข้ามาบนเว็บของเรา มีคำหยาบหรือไม่ เราก็จะใช้ Regular expression นี่แหละ เป็นตัวตรวจสอบ นอกจากจะใช้ตรวจสอบแล้ว ยังสั่งแก้ได้อีกด้วย เช่น จะแก้คำว่า ประสิทธิ์ เป็นคำว่า ประสาท ก็ทำได้ โดยไม่ต้องไปค้นหาเอง แต่สั่งให้โปรแกรมค้นหา โดยใช้ Regular expression นี่แหละ แล้วแทนที่คำคำนั้น ด้วยคำที่เราต้องการ
เห็นไหมล่ะว่า Regular expression มีประโยชน์อย่างไร
Regular expression คืออะไร?
ดูรายละเอียดจาก www.goragod.com
ขออนุญาต Penthai นำมาเผยแพร่นะครับ