Topic List
ทดลองทำ Load Test กับ server
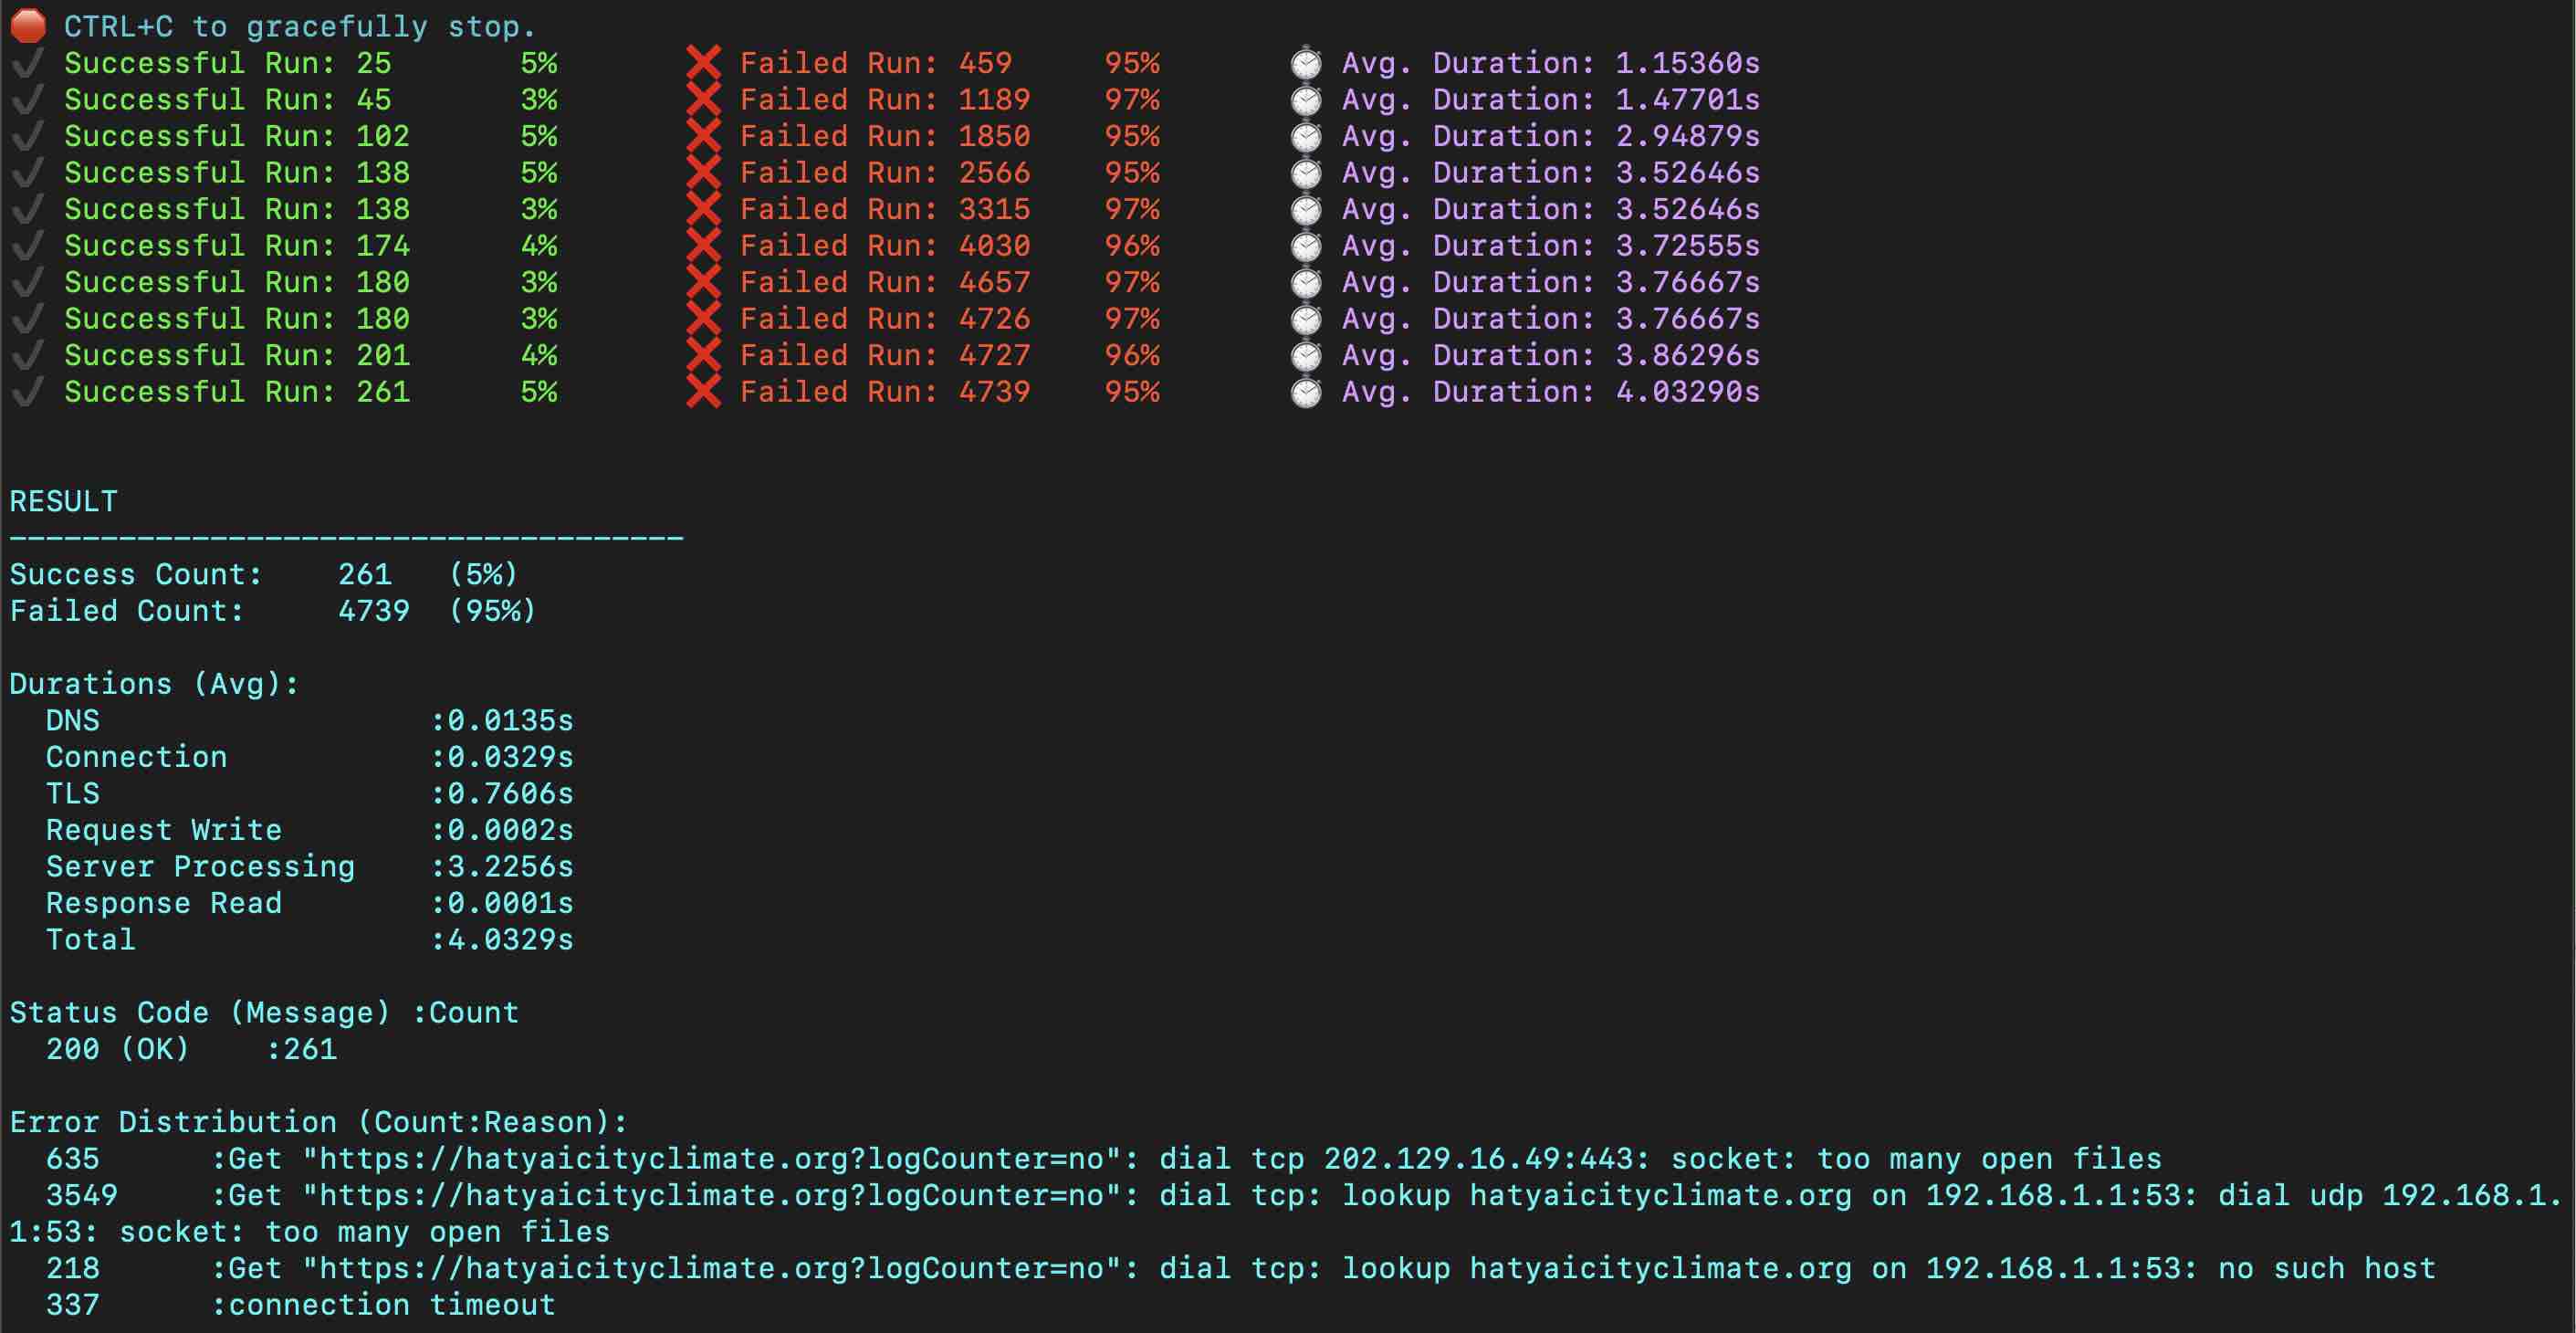
ddosify -t "http://localhost/seti/softganz.com?logCounter=no" -m GET -n 5000 -d 60 -T 10
ผล ไม่ผ่าน
RESULT
Success Count: 261 (5%)
Failed Count: 4739 (95%)
เดี๋ยวค่อยมาเขียนรายละเอียด
Install Apache
Location of Apache config file is /opt/homebrew/etc/httpd/httpd.conf Change www home folder
mv /opt/homebrew/var/www /opt/homebrew/var/www.bak
ln -s /Users/httpdocs /opt/homebrew/var/www
brew services restart apache2
brew tap shivammathur/php
เลือกมาสักเวอร์ชั่น
brew install shivammathur/php/php@5.6
brew install shivammathur/php/php@7.0
brew install shivammathur/php/php@7.1
brew install shivammathur/php/php@7.2
brew install shivammathur/php/php@7.3
brew install shivammathur/php/php@7.4
brew install shivammathur/php/php@8.0
brew install shivammathur/php/php@8.1
brew install shivammathur/php/php@8.2
Mac M1 : Config file อยู่ที่
/opt/homebrew/etc/php/7.0/php.ini
/opt/homebrew/etc/php/7.1/php.ini
/opt/homebrew/etc/php/7.2/php.ini
/opt/homebrew/etc/php/7.3/php.ini
/opt/homebrew/etc/php/7.4/php.ini
/opt/homebrew/etc/php/8.0/php.ini
/opt/homebrew/etc/php/8.1/php.ini
/opt/homebrew/etc/php/8.2/php.ini
Mac Intel : Config file อยู่ที่
/usr/local/etc/php/5.6/php.ini
/usr/local/etc/php/7.0/php.ini
/usr/local/etc/php/7.1/php.ini
/usr/local/etc/php/7.2/php.ini
/usr/local/etc/php/7.3/php.ini
/usr/local/etc/php/7.4/php.ini
/usr/local/etc/php/8.0/php.ini
ผลลัพท์ตอนติดตั้ง
To enable PHP in Apache add the following to httpd.conf and restart Apache:
    LoadModule php7_module /usr/local/opt/php@7.4/lib/httpd/modules/libphp7.so

<FilesMatch .php$>
    SetHandler application/x-httpd-php
</FilesMatch>


Finally, check DirectoryIndex includes index.php
    DirectoryIndex index.php index.html

The php.ini and php-fpm.ini file can be found in:
    /usr/local/etc/php/7.4/

php@7.4 is keg-only, which means it was not symlinked into /usr/local,
because this is an alternate version of another formula.

If you need to have php@7.4 first in your PATH, run:
  echo 'export PATH="/usr/local/opt/php@7.4/bin:$PATH"' >> ~/.zshrc
  echo 'export PATH="/usr/local/opt/php@7.4/sbin:$PATH"' >> ~/.zshrc

For compilers to find php@7.4 you may need to set:
  export LDFLAGS="-L/usr/local/opt/php@7.4/lib"
  export CPPFLAGS="-I/usr/local/opt/php@7.4/include"<br />
<br />
<br />
To start shivammathur/php/php@7.4:
  brew services start shivammathur/php/php@7.4
Or, if you don't want/need a background service you can just run:
  /usr/local/opt/php@7.4/sbin/php-fpm --nodaemonize
เปลี่ยนลิงก์
brew unlink php && brew link --overwrite --force php@7.4
Apache
แก้ไขไฟล์ /opt/homebrew/etc/httpd/httpd.conf /etc/apache2/httpd.conf หรือ /usr/local/etc/httpd/httpd.conf file scroll to the bottom of the LoadModule entries.
 LoadModule php5_module /usr/local/opt/php@5.6/lib/httpd/modules/libphp5.so
 <a class="hashtag" href="/tags/LoadModule">#LoadModule</a> php7_module /usr/local/opt/php@7.0/lib/httpd/modules/libphp7.so
 <a class="hashtag" href="/tags/LoadModule">#LoadModule</a> php7_module /usr/local/opt/php@7.1/lib/httpd/modules/libphp7.so
 <a class="hashtag" href="/tags/LoadModule">#LoadModule</a> php7_module /usr/local/opt/php@7.2/lib/httpd/modules/libphp7.so
 <a class="hashtag" href="/tags/LoadModule">#LoadModule</a> php7_module /usr/local/opt/php@7.3/lib/httpd/modules/libphp7.so
 <a class="hashtag" href="/tags/LoadModule">#LoadModule</a> php7_module /usr/local/opt/php@7.4/lib/httpd/modules/libphp7.so
 <a class="hashtag" href="/tags/LoadModule">#LoadModule</a> php_module /usr/local/opt/php@8.0/lib/httpd/modules/libphp.so
 <a class="hashtag" href="/tags/LoadModule">#LoadModule</a> php_module /usr/local/opt/php@8.1/lib/httpd/modules/libphp.so
ใช้ sphp เป็นตัวเปลี่ยน version จะสะดวกกว่า
curl -L https://gist.githubusercontent.com/rhukster/f4c04f1bf59e0b74e335ee5d186a98e2/raw/adc8c149876bff14a33e3ac351588fdbe8172c07/sphp.sh > /opt/homebrew/bin/sphp
chmod +x /opt/homebrew/bin/sphp
sphp 8.1
Install MariaDB
brew install mariadb
Restart MariaDB
Auto start
brew services start mariadb
Manual start
mysql.server restart
Location of database is /opt/homebrew/var/mysql, If you want to change use symbolic link to new location
brew services stop mariadb
cp -R /opt/homebrew/var/mysql /Users/mysql
mv /opt/homebrew/var/mysql /opt/homebrew/var/mysql.bak
mkdir /opt/homebrew/var/mysql
ln -s /Users/mysql /opt/homebrew/var/mysql
brew services start mariadb
MariaDB Configuration
แก้ไขไฟล์ /opt/homebrew/etc/my.cnf.d/my.cnf
[mysqld]
sqlmode="NOFIELDOPTIONS"
  # Avaliable Mode<br />
  # "NOFIELDOPTIONS,IGORESPACE,NOZEROINDATE,NOZERODATE,ERRORFORDIVISIONBYZERO,NOAUTOCREATEUSER,NOENGINESUBSTITUTION"
default-storage-engine = MYISAM
character-set-server = utf8
  <a class="hashtag" href="/tags/collation">#collation</a>-server = utf32unicodeci
หากไม่ต้องการให้ตรวจสอบการบันทึกข้อมูลของฟิลด์ เช่น ข้อมูลยาวเกินกว่าที่กำหนดในฟิลด์ ให้กำหนด mode เป็น NOFIELDOPTIONS
ที่มา
ติดตั้ง Server ใหม่ของ Ubuntu Server เขียนบันทึกคำสั่งไว้สักหน่อย
Apache Installation
sudo apt update
sudo apt upgrade

sudo apt install apache2 -y
systemctl status apache2

sudo a2dismod ssl
sudo a2enmod ssl
sudo a2enmod rewrite
Apache config
sudo nano /etc/apache2/sites-available/000-default.conf
เพิ่ม AllowOverride Al
<Directory /home/>
        Options Indexes FollowSymLinks
        Options FollowSymLinks
        AllowOverride All
        Order allow,deny
        allow from all
        Require all granted
</Directory>
sudo apt-get install mariadb-server mariadb-client systemctl status mariadbsudo nano /etc/mysql/conf.d/mysqld.cnf sudo systemctl restart mysql
debian : service mysqld restart
กรณีที่ติดตั้ง mariadb แล้วไม่ได้กำหนดรหัสของ root
mysql --versionsystemctl stop mariadb systemctl set-environment MYSQLD_OPTS="--skip-grant-tables --skip-networking" systemctl start mariadb mysql -u root
mysql> FLUSH PRIVILEGES; mysql> SET PASSWORD FOR 'root'@localhost = PASSWORD("newpassword"); mysql> quit
sudo systemctl unset-environment MYSQLD_OPTS sudo systemctl restart mariadb
mysql -u root -p
mysql> CREATE USER 'newuser'@'localhost' IDENTIFIED BY 'password'; mysql> GRANT ALL PRIVILEGES ON * . * TO 'newuser'@'localhost';
#MySql Config
ตรวจสอบว่าควรกำหนดค่า keybuffersize สักเท่าไหร่ดี
SELECT CONCAT(ROUND(KBS/POWER(1024,
    -> IF(PowerOf1024<0,0,IF(PowerOf1024>3,0,PowerOf1024)))+0.4999),
    -> SUBSTR(' KMG',IF(PowerOf1024<0,0,
    -> IF(PowerOf1024>3,0,PowerOf1024))+1,1))
    -> recommendedkeybuffersize FROM
    -> (SELECT LEAST(POWER(2,32),KBS1) KBS
    -> FROM (SELECT SUM(indexlength) KBS1
    -> FROM informationschema.tables
    -> WHERE engine='MyISAM' AND
    -> tableschema NOT IN ('information_schema','mysql')) AA ) A,
    -> (SELECT 2 PowerOf1024) B;
name /etc/my.cnf
 <a class="hashtag" href="/tags/MyISAM">#MyISAM</a>
key_buffer_size=4096M
join_buffer_size=256K  # from 140M for row pointers
thread_cache_size=40  # from 8 to avoid thread starvation
query_cache_limit=8M  # from 4M since you have QC turned OFF
key_cache_age_threshold=7200  # from 300 seconds to reduce key_reads RPS
key_cache_division_limit=50  # from 100 percent for HOT/WARM caches
key_cache_block_size=16K  # from 1K to evict bigger block when full
open_files_limit=30000  # from 1024 to reduce opened_files RPS
table_open_cache=10000  # from 407 to reduce opened_tables RPS
table_definition_cache=2000  # from 603 to reduce opened_table_definitions RPS
max_heap_table_size=48M  # from 32M  for additional capacity
tmp_table_size=48M  # from 32M to reduce created_tmp_disk_tables count
innodb_io_capacity=1600  # from 200 to allow more IOPS
read_rnd_buffer_size=192K  # from 256K to reduce handler_read_rnd_next RPS
sort_buffer_size=2M  # from 256K to reduce sort_merge_passes count

 <a class="hashtag" href="/tags/Innodb">#Innodb</a>
<a class="hashtag" href="/tags/innodb">#innodb</a>_buffer_pool_size = 6144M
innodb_log_file_size = 512M
innodb_lru_scan_depth=100  # from 1024 to reduce CPU busy every SE$

max_connections = 500
key_buffer_size = 512M
ติดตั้ง PHP => How to install PHP 7.4 on Ubuntu 22.04 LTS Jammy Linux
sudo apt update && sudo apt upgrade
sudo apt install software-properties-common
sudo add-apt-repository ppa:ondrej/php -y

sudo apt install php7.4
sudo apt install php7.4-{cli,common,curl,zip,gd,mysql,xml,mbstring,json,intl}

sudo update-alternatives --config php
sudo apt-get install php7.4 php7.4-mysql php-common php7.4-cli php7.4-json php7.4-common php7.4-opcache libapache2-mod-php7.4

sudo nano /etc/php/7.4/fpm/php.ini

sudo systemctl restart apache2
sudo systemctl restart mysql

wget -r --ask-password ftp://user:example.com/
Install phpMyAdmin
sudo apt install phpmyadmin php-mbstring php-zip php-gd php-json php-curl
Mount volumn จาก server เดิม มาไว้ใน server ใหม่ เพื่อทำการ copy file
sudo apt install sshfs

mkdir folder
sshfs -p 22 username@example.com:/home/folder/ folder
ใช้งานเสร็จก็ un mount
umount folder
Configuration
ที่มา
- How to install LAMP stack web server on Ubuntu 20.04
- How To Create a New User and Grant Permissions in MySQL
- How to recursively download a folder via FTP on Linux
- How can I disable and enable SSL in Apache
- How To Reset Your MySQL or MariaDB Root Password on Ubuntu 18.04
- How to enable mod_rewrite in apache ubuntu
- How to install PHP 7.4 on Ubuntu 22.04 LTS Jammy Linux
รอก่อนนะ ค่อยกลับมาทยอยเขียน
Edit Apache config
sudo nano /etc/apache2/httpd.conf
ServerName my.local.:80

<Directory "/">
AllowOverride All
Require all denied
</Directory>

<Directory "/Library/WebServer/Documents">
AllowOverride All
</Directory>
Restart Apache
sudo apachectl restart
sudo apachectl -k graceful
Edit MariaDB config
nano ~/.my.cnf
Restart MariaDB
Auto start
brew services start mariadb
Manual start
mysql.server restart
Configuration
PHP Config
nano /usr/local/etc/php/8.0/php.ini
...
post_max_size = 1024M
upload_max_filesize = 1024M
...
ที่มา
แปะไว้ก่อน ค่อยมาเขียนรายละเอียดนะครับ
sudo nano /etc/php/7.4/fpm/php.ini sudo systemctl restart apache2sudo nano /etc/mysql/conf.d/mysqld.cnf sudo systemctl restart mysql
mkdir remotefolder sshfs -p 22 username@example.com:/home/folder/ remotefolder umount remotefolder
sshfs -p 22 username@example.com:/home/user/domains/example.com/public_html/ remotefolder nohup rsync -trv remotefolder/path/ path/ &
sudo apt update<br /> sudo apt upgrade
sudo apt install apache2 -y systemctl status apache2
sudo a2dismod ssl sudo a2enmod ssl<br /> <br /> <br />
apt install php7.4 php7.4-mysql php-common php7.4-cli php7.4-json php7.4-common php7.4-opcache libapache2-mod-php7.4
apt install mariadb-server mariadb-client systemctl status mariadb
mysql> CREATE USER 'newuser'@'localhost' IDENTIFIED BY 'password'; mysql> GRANT ALL PRIVILEGES ON * . * TO 'newuser'@'localhost';<br /> <br /> <br />
sudo systemctl restart apache2<br /> sudo systemctl restart mysql<br /> <br /> <br /> wget -r --ask-password ftp://user:server.com/
- https://upcloud.com/community/tutorials/installing-lamp-stack-ubuntu/?utmterm=&utmcampaign=DSA&utmsource=adwords&utmmedium=ppc&hsaacc=9391663435&hsacam=7185608860&hsagrp=81739862313&hsaad=391197952986&hsasrc=g&hsatgt=dsa-460992423274&hsakw=&hsamt=b&hsanet=adwords&hsaver=3&gclid=CjwKCAiAeb-BRB2EiwAGBnXXuae-7ru2jsgSAiku6bX0k7XucjvKLGBQkSm-DKo92SXjG1odKAeRoCid0QAvD_BwE - https://www.digitalocean.com/community/tutorials/how-to-create-a-new-user-and-grant-permissions-in-mysql - https://stackoverflow.com/questions/113886/how-to-recursively-download-a-folder-via-ftp-on-linux - https://askubuntu.com/questions/709594/how-can-i-disable-and-enable-ssl-in-apache-without-a-command-if-possible
Apache Tuning from How To Optimize Apache
Timeout 300
KeepAlive On
MaxKeepAliveRequests 100
KeepAliveTimeout 15
MinSpareServers 5
MaxSpareServers 10
StartServers 5
MaxClients 150
MaxRequestsPerChild 0
Create new user how
sudo adduser userName
Make user sudo how
sudo adduser userName sudo
MySQL Configuration
- Increrase memory size for MySQL Server using nano /etc/my.cnf and add/change value ตามรายละเอียด
innodbbufferpoolsize = 2048M
innodblogfilesize = 512M
maxconnections = 500
keybuffer_size = 512M
PHP Config
Set timezone to Asia/Bangkok
nano /etc/php/7.4/apache2/php.ini
date.timezone = Asia/Bangkok
Add CNAME domain.com to ppi.psu.ac.th
Add new site to Apache
cd /etc/apache2/sites-available
nano sites-available/doname.com.conf
<VirtualHost *:80>
    ServerName domain.com
    ServerAdmin webmaster@localhost
    DocumentRoot /var/www/html/domain.com
</VirtualHost>
<VirtualHost *:80>
    ServerName www.domain.com
    ServerAdmin webmaster@localhost
    DocumentRoot /var/www/html/domain.com
</VirtualHost>

<IfModule mod_ssl.c>
<VirtualHost _default_:443>
    ServerName domain.com
    ServerAdmin webmaster@localhost
    DocumentRoot /home/user/domains/domain.com
</VirtualHost>
<VirtualHost _default_:443>
    ServerName www.domain.com
    ServerAdmin webmaster@localhost
    DocumentRoot /home/user/domains/domain.com
</VirtualHost>
</IfModule>
cd /etc/apache2/sites-enabled
ln -s ../sites-available/domain.com.conf domain.com.conf
Restart Apache
systemctl restart apache2
Restart MySql
systemctl restart mysql
INSTALL Let's Encrypt
1. ติดตั้งด้วย snap ดูรายละเอียดได้ที่ Certbot instructions
snap install --classic certbot
ln -s /snap/bin/certbot /usr/bin/certbot
certbot --apache
certbot certonly --apache
certbot renew --dry-run
2. ติดตั้งด้วย apt-get จาก repo
apt-add-repository -r ppa:certbot/certbot
After that, the following commands do not generate any errors:
apt update
apt-get update
apt install python3-certbot-apache
certbot --apache -d domain.com -d www.domain.com
You should test your configuration at:
https://www.ssllabs.com/ssltest/analyze.html?d=domain.com
IMPORTANT NOTES:
Congratulations! Your certificate and chain have been saved at:
- /etc/letsencrypt/live/domain.com/fullchain.pem
- Your key file has been saved at:
- /etc/letsencrypt/live/domain.com/privkey.pem
- Your cert will expire on 2021-01-08. To obtain a new or tweaked version of this certificate in the future, simply run certbot again with the "certonly" option. To non-interactively renew all of your certificates, run "certbot renew"
To test the renewal process, you can do a dry run with certbot:
sudo certbot renew --dry-run
Correct way to completely remove issued certificate(s) for a domain
certbot delete --cert-name domain.com
Copy file from another server using SSH
Alternatively, you could mount the myserver's filesystem over SSH with sshfs. This may be too much hassle for a one-off need, but convenient if you do this sort of thing often.
mkdir myserver
sshfs -p 22 domain.com:/path/ myserver
wget -O ~/myserver/path/to/remote/destination http://www.example.com/whatever

rsync -trv myserver/src/path/ dest/path/
umount myserver
rsync in background
nohup rsync -trv myserver/src/path/ dest/path/ &
Dump Database
mysqldump -u [username] -p [database-you-want-to-dump] > [path-to-place-data-dump.sql]
/usr/local/mysql/bin/mysqldump -u [username] -p [database-you-want-to-dump] > [path-to-place-data-dump.sql]
Ways to Flush DNS Cache on Mac OSx
sudo killall -HUP mDNSResponder
WhoIs LookUp
nslookup -type=ns softganz.com
Setup Time Sync
ติดตั้ง
apt-get install ntp
แก้ไข config
nano /etc/ntp.conf
เปลี่ยน server เป็น
server 1.th.pool.ntp.org
server 0.asia.pool.ntp.org
server 2.asia.pool.ntp.org
server clock.nectec.or.th
Restart
service ntpd restart
หรือ
service ntp restart
ที่มา
- Certbot instructions
- How To Secure Apache with Let's Encrypt on Ubuntu 18.04
- E: The repository 'http://ppa.launchpad.net/certbot/certbot/ubuntu focal Release' does not have a Release file
- How To Use SSHFS to Mount Remote File Systems Over SSH
- How to wget a file to a remote machine over SSH?
- Correct way to completely remove issued certificate(s) for a domain
- How to increase memory size for MySQL Server
- MySQL Performance Tuning Settings
- HOWTO: Sync เวลาไม่ควรใช้ ntpdate ควรใช้ ntpd แทน
umount -l /dev/sda1
e2fsck -cfpv /dev/sda1 > chresult.txt&
sudo apt-get install netatalk
sudo nano /etc/netatalk/AppleVolumes.default
/shares "Shares" /media/user/VolumeName "ShareName"
sudo /etc/init.d/netatalk restart
เข้าสู่ยุค https จึงจำต้องทำเสียแล้ว
มาลองติดตั้ง Let's Encrypt บน Directadmin กันอีกสักรอบ
1. เริ่มด้วยการแก้ไข config ของ Directadmin ให้สามารถใช้งาน Let's Encrypt ก่อน
nano /usr/local/directadmin/conf/directadmin.conf
สำหรับใครที่ใช้ path : /var/www/html/.well-known (ใช้โดเมนเดียว) ให้เพิ่ม
enable_ssl_sni=1
letsencrypt=1
ส่วนใครที่ใช้ path : /home/user/domains/domain.com/public_html/.well-known (ใช้หลายโดเมน) ให้เพิ่ม
enable_ssl_sni=1
letsencrypt=2
หรือจะสั่งผ่าน Terminal ก็ได้โดย
echo enable_ssl_sni=1 >> /usr/local/directadmin/conf/directadmin.conf
echo letsencrypt=2 >> /usr/local/directadmin/conf/directadmin.conf
แล้วสั่ง update config โดย
cd /usr/local/directadmin/custombuild
./build update
./build rewrite_confs
2. แล้วมาเพิ่ม Let's Encrypt ให้กับแต่ละเว็บ
กำหนดให้เว็บสามารถใช้งาน Secure SSL ก่อน
แล้วจึงไปเพิ่ม SSL Certificates ให้กับเว็บ โดยเลือก Free & automatic certificate from Let's Encrypt
(ต้องทำทั้ง www และ ไม่มี www)
ถ้าต้องการให้สามารถใช้งานได้ทั้ง https และ http ให้สร้าง link private _ html ให้ชี้ไปที่ public _ html ด้วยคำสั่ง
ln -s public _ html private _ html
แต่ถ้าต้องการให้ใช้งานเฉพาะ https อย่างเดียว ให้ rename public _ html ไปเป็น private _ html แล้วสร้าง folder public _ html ใหม่ และสร้างไฟล์ .htaccess โดยเพิ่มคำสั่ง
RewriteCond %{HTTPS} off
RewriteRule (.*) https://%{HTTP_HOST}%{REQUEST_URI}
Let's Encrypt ก็จะเป็นของเรา
top :: the Linux Top Command
top
iotop :: I/O Monitor
iotop
iftop :: Bandwidth Monitor
iftop
iptstate : IP Tables State
iptstate
df :: Display Free Disk Space
df