มีโจทย์ว่าต้องการเพิ่ม user ใน Ubuntu แต่จำกัดไม่ให้เปลี่ยน folder หรือ ไม่ให้เข้าถึงบาง folder ซึ่งตามปกติบน Linux จะจัดการสิทธิได้ 3 ระดับ คือ เจ้าของ/กลุ่ม/คนอื่นๆ โดยไม่สามารถจัดการเฉพาะ user ได้
จึงจำเป็นต้องใช้โปรแกรมสำหรับจัดการสิทธิเพิ่มเติม ในที่นี้จะใช้ setfacl : set file access control lists - Linux
1.ยกเลิกการเข้าถึง folder
setfacl -m user:username:--- folder/
2.อื่น ประมาณเช่น
setfacl -R -m g:username:rwx /home/user1/domains/xxx.com/folder/
setfacl -m u:username:--x /home/user1/domains/xxx.com/
setfacl -R -x user:username /home/user1/domains/xxx.com/folder/
setfacl -m u:username:--x /home/user1/domains
setfacl -m u:username:--x /home/user1
3.ขอดูสิทธิ
getfacl folder
yum update iproute
yum update ss
brew services list
brew services restart nginx
/opt/homebrew/opt/nginx/bin/nginx -g daemon off;

brew install shivammathur/php/php@7.4
brew reinstall php@7.4

sudo lsof -i -n -P|grep php-fpm

brew services start php@8.2
แก้ไขไฟล์ opt/homebrew/etc/nginx/nginx.conf
    location / {
        root /path/to/www;
        try_files $uri $uri/ /index.php?$uri&$args;
    }
Install multiple PHP version
brew tap shivammathur/php
เลือกมาสักเวอร์ชั่น
brew install shivammathur/php/php@5.6
brew install shivammathur/php/php@7.0
brew install shivammathur/php/php@7.1
brew install shivammathur/php/php@7.2
brew install shivammathur/php/php@7.3
brew install shivammathur/php/php@7.4
brew install shivammathur/php/php@8.0
brew install shivammathur/php/php@8.1
brew install shivammathur/php/php@8.2
brew install shivammathur/php/php@8.3
brew install php@8.4
brew install php@8.5
Mac M1 : Config file อยู่ที่
/opt/homebrew/etc/php/7.0/php.ini
/opt/homebrew/etc/php/7.1/php.ini
/opt/homebrew/etc/php/7.2/php.ini
/opt/homebrew/etc/php/7.3/php.ini
/opt/homebrew/etc/php/7.4/php.ini
/opt/homebrew/etc/php/8.0/php.ini
/opt/homebrew/etc/php/8.1/php.ini
/opt/homebrew/etc/php/8.2/php.ini
/opt/homebrew/etc/php/8.3/php.ini
แก้ไขไฟล์ php.ini ที่ /opt/homebrew/etc/php/8.0/php-fpm.d/www.conf เปลี่ยน port จาก 9000 เป็น 9080
restart php
brew services start php@8.0
Problem
1.Can't upload jpg/pdf
- Remove folder /opt/homebrew/var/run/nginx
- Create folder /opt/homebrew/var/run/nginx again with user in nginx
ที่มา - Introduction to NGINX
- Install Nginx & Multiple PHP Versions on macOS 12 Monterey
Update OS
sudo apt update
sudo apt upgrade
Mount harddisk
Using /dev/disk/by-uuid/:
- Open a terminal.
- Type blkid or ls -l /dev/disk/by-uuid/ and press Enter.
- This will display a list of symlinks, where the filename is the UUID and the target is the device it points to (e.g., lrwxrwxrwx 1 root root 10 Jul 12 12:00 1234-5678 -> ../../sda1).
- Identify the UUID you need and then use the corresponding device path (e.g., /dev/sda1) in other commands if needed.
Edit file /etc/fstab
/dev/disk/by-uuid/50046676-d3fb-6183-54e4-7d65cd58e8ad /mount_name ext4 defaults 0 1
Then update new fstab with command ???
Check harddisk problem
Check with
Repair withfsck /dev/sdax
fsck /dev/sdax -y
Create new user
Ubuntu create user account commandsMake user to sudoersudo adduser <username>
Make user sshsudo adduser <username> sudo
Setup ssh to login with password
ที่มา How to change the SSH port nano etc/ssh/sshd_config or nano /etc/ssh/sshd_config.d/60-cloudimg-settings.conf Change value to yesPort 22 ... PasswordAuthentication yes
###Generate an SSH Key Run command in localsudo ufw allow 22/tcp sudo ufw reload sudo service ssh restart sudo systemctl status sshd ss -tuln | grep [new_port_number]
Check current services runningssh-keygen -t ed25519 ssh-copy-id -p 22 username@your_server_ip ssh username@your_server_ip
sudo service --status-all
Step 1 – Installing the Nginx Web Server
Install nginx lastest version from nginx server
nginx: Linux packagesImport an official nginx signing key so apt could verify the packages authenticity. Fetch the key:sudo apt install curl gnupg2 ca-certificates lsb-release ubuntu-keyring
curl https://nginx.org/keys/nginx_signing.key | gpg --dearmor \
    | sudo tee /usr/share/keyrings/nginx-archive-keyring.gpg >/dev/null
The output should contain the full fingerprint 573BFD6B3D8FBC641079A6ABABF5BD827BD9BF62 as follows:gpg --dry-run --quiet --no-keyring --import --import-options import-show /usr/share/keyrings/nginx-archive-keyring.gpg
 [expires: 2027-05-24]
      573BFD6B3D8FBC641079A6ABABF5BD827BD9BF62
uid                      nginx signing key <signing-key@nginx.com>
echo "deb [signed-by=/usr/share/keyrings/nginx-archive-keyring.gpg] \
https://nginx.org/packages/ubuntu `lsb_release -cs` nginx" \
    | sudo tee /etc/apt/sources.list.d/nginx.list
echo "deb [signed-by=/usr/share/keyrings/nginx-archive-keyring.gpg] \
https://nginx.org/packages/mainline/ubuntu `lsb_release -cs` nginx" \
    | sudo tee /etc/apt/sources.list.d/nginx.list
echo -e "Package: *\nPin: origin nginx.org\nPin: release o=nginx\nPin-Priority: 900\n" \
    | sudo tee /etc/apt/preferences.d/99nginx
sudo apt update
sudo apt install nginx

nginx -version

sudo service nginx start
sudo ufw allow 80
Install nginx current version from Ubuntu repo
Test nginx configsudo apt install nginx
Restart nginxsudo nginx -t
sudo systemctl restart nginx
sudo systemctl reload nginx
sudo service nginx restart
sudo service nginx reload
sudo nano /etc/nginx/sites-available/your_domain
Enable HTTP/2 in Nginx on Ubuntu
http2 on;
listen 443 ssl;
listen [::]:443 ssl ipv6only=on;
Step 2 – Installing MariaDB to Manage Site Data
Install MariaDB lastest version from MariaDB server
More informationHere are the commands to run to import the MariaDB repository key on your Ubuntu system:
sudo apt-get install apt-transport-https curl
sudo mkdir -p /etc/apt/keyrings
sudo curl -o /etc/apt/keyrings/mariadb-keyring.pgp 'https://mariadb.org/mariadbreleasesigning_key.pgp'
Once the key is imported, copy and paste the following into a file under /etc/apt/sources.list.d (for instance /etc/apt/sources.list.d/mariadb.sources):
# MariaDB 12.3 repository list - created 2026-03-06 08:09 UTC
# https://mariadb.org/download/
X-Repolib-Name: MariaDB
Types: deb
# deb.mariadb.org is a dynamic mirror if your preferred mirror goes offline. See https://mariadb.org/mirrorbits/ for details.
# URIs: https://deb.mariadb.org/12.rc/ubuntu
URIs: https://mirror.kku.ac.th/mariadb/repo/12.3/ubuntu
Suites: questing
Components: main main/debug
Signed-By: /etc/apt/keyrings/mariadb-keyring.pgp
You can now install MariaDB 12.3 from the MariaDB repository with:
sudo apt-get update
sudo apt-get install mariadb-server
Debug symbol packages, those that end in a '-dbgsym' suffix, are harmless to install. They are typically used to resolve stack traces and provide detail of perf recordings. They do not change the running behaviour of MariaDB. If in doubt, omit from installation.
If you need source packages, replace Types: deb with Types: deb deb-src in the /etc/apt/sources.list.d/mariadb.sources file. Then, you can obtain the mariadb source after installing dpkg-dev package, with apt-get source mariadb-server.
If you prefer to use the old "one-line-style" APT format, create the file /etc/apt/sources.list.d/mariadb.list with the following:
# MariaDB 12.3 repository list - created 2026-03-06 08:09 UTC
# https://mariadb.org/download/
# deb.mariadb.org is a dynamic mirror if your preferred mirror goes offline. See https://mariadb.org/mirrorbits/ for details.
# deb [signed-by=/etc/apt/keyrings/mariadb-keyring.pgp] https://deb.mariadb.org/12.3/ubuntu questing main
deb [signed-by=/etc/apt/keyrings/mariadb-keyring.pgp] https://mirror.kku.ac.th/mariadb/repo/12.3/ubuntu questing main
# deb-src [signed-by=/etc/apt/keyrings/mariadb-keyring.pgp] https://mirror.kku.ac.th/mariadb/repo/12.3/ubuntu questing main
See Installing MariaDB packages for more information.
Or install from Ubuntu repo (maybe not lastest version)
sudo apt install mariadb-server
sudo mysql_secure_installation
    Switch to unix_socket authentication [Y/n] n
Create user
sudo mysql mysql> ALTER USER 'root'@'localhost' IDENTIFIED WITH mysqlnativepassword BY 'password'; mysql> FLUSH PRIVILEGES;mysql> CREATE USER 'newuser'@'localhost' IDENTIFIED BY 'strongpassword'; mysql> GRANT ALL PRIVILEGES ON . TO 'username'@'localhost' WITH GRANT OPTION; mysql> FLUSH PRIVILEGES;
mysql> SHOW GRANTS FOR 'username'@'localhost';
Change data folder
Warning: Changing the location for a MySQL server is an administrative task which is not officially supported by Plesk. The solution should be applied on your risk. As an alternative to moving the MySQL data directory to another location, consider mounting a partition from a new disk to the default MySQL data directory location /var/lib/mysql/ Create a backup of /etc/my.cnf(CentOS/RHEL) or /etc/mysql/my.cnf(Debian/Ubuntu)
Copy or move all files from /var/lib/mysql to the desired directory and set the permissions:# cp /etc/my.cnf /etc/my.cnf.backup
# cp -pr /var/lib/mysql /data/mysql
Update /etc/my.cnf or /etc/mysql/my.cnf(Debian/Ubuntu) using vi text editor and change the location to where you have copied mysql directory:# chown -R mysql:mysql /data/mysql
datadir=/data/mysql Note: Be sure that the path to socket mysql.sock is unchanged in my.cnf and it is /var/lib/mysql. Also the directory /var/lib/mysql itself should present on the server as changing the path to the socket can cause the Plesk to crush. Create a configuration file:# vi /etc/my.cnf
Add necessary content into the created file:# touch /etc/systemd/system/mariadb.service.d/mariadb_custom.conf
# echo "[Service]" >> /etc/systemd/system/mariadb.service.d/mariadb_custom.conf
Create a backup of /etc/passwd:# echo "ProtectHome=false" >> /etc/systemd/system/mariadb.service.d/mariadb_custom.conf
Modify the string below in /etc/passwd and set up the new MySQL location: mysql:x:27:27:MariaDB Server:/data/mysql:/sbin/nologin Restart mysqld: Debian/Ubuntu:# cp -a /etc/passwd /etc/passwd.backup
CentOS:# service mysqld restart
Update /etc/psa/psa.conf with a path to the new mysql directory: MYSQLVARD /data/mysql In case of Ubuntu 16.04, disable mysql in apparmor: Modify file /etc/apparmor.d/usr.sbin.mysqld (create it if it doesn't exist using vi editor), add: /usr/sbin/mysqld { }# service mariadb restart
# rm /etc/apparmor.d/disable/usr.sbin.mysqld
# apparmor_parser -a /etc/apparmor.d/usr.sbin.mysqld
For CentOS/RHEL, SELinux context should be changed or it should be disabled.# aa-disable /etc/apparmor.d/usr.sbin.mysqld
ปรับแต่ง config
nano /etc/mysql/mariadb.conf.d/50-server.cnf
[mysqld]
log_slow_query_file    = /var/log/mysql/mariadb-slow.log
log_slow_query_time    = 2
...
innodb_buffer_pool_size = 256M
innodb_log_file_size = 128M
ตรวจสอบตารางว่า crash หรือไม่
mariadb-check -u user -p -c database
Backup and restore data
Common mysqldump Commands Backup a single database:
Backup specific tables:mysqldump -u [username] -p [database_name] > [backup_name.sql]
Backup all databases:mysqldump -u [username] -p [database_name] [table1] [table2] > [tables_backup.sql]
Backup only the structure (no data):mysqldump -u [username] -p --all-databases > [all_databases.sql]
Backup and compress (requires gzip):mysqldump -u [username] -p --no-data [database_name] > [structure.sql]
Restore database:mysqldump -u [username] -p [database_name] | gzip > [backup_name.sql.gz]
mysql -u [username] -p
mysql> use database_name
mysql> source \folder\backup_name.sql
Step 3 – Installing PHP and Configuring Nginx to Use the PHP Processor => รายละเอียด
sudo apt-get purge php7.*
sudo apt purge php8.*
sudo apt-get autoclean
sudo apt-get autoremove
Install php 8.5
sudo add-apt-repository ppa:ondrej/nginx
sudo add-apt-repository ppa:ondrej/php
sudo apt update && sudo apt-get install ca-certificates apt-transport-https software-properties-common
sudo apt install php8.5-fpm
php -v
php --modules
apt install -y php8.5-common php8.5-fpm php8.5-mysql php8.5-zip php8.5-gd php8.5-mbstring php8.5-cli php8.5-curl php8.5-xml php8.5-bcmath
Install php 8.3
sudo add-apt-repository ppa:ondrej/nginx
sudo apt update && sudo apt-get install ca-certificates apt-transport-https software-properties-common
sudo apt install php8.3-fpm
php -v
php --modules
apt install -y php8.3-common php8.3-fpm php8.3-mysql php8.3-redis php8.3-mongodb php8.3-zip php8.3-gd php8.3-mbstring php8.3-cli php8.3-curl php8.3-xml php8.3-bcmath
หากเกิด error permission denied โดยดูจาก nginx error.log
sudo tail -30 /var/log/nginx/error.log
วิธีแก้ปัญา The socket permissions look correct, but still failing. Let's diagnose further: 1. Check what user nginx runs as:connect() to unix:/run/php/php8.5-fpm.sock failed (13: Permission denied) while connecting to upstream, client: 171.7.216.140, server: softgang.app, request: "GET /info.php HTTP/2.0", upstream: "fastcgi://unix:/run/php/php8.5-fpm.sock:", host: "softgang.app"
If it's nginx user (not www-data), that's the problem. Add nginx to www-data group:ps aux | grep nginx
The issue was the nginx user didn't have permissions to access the socket owned by www-data. Adding nginx to the www-data group solved it.sudo usermod -a -G www-data nginx sudo systemctl restart nginx
This is a common gotcha when nginx and PHP-FPM run as different users. Your PHP app should now be working properly! 2. Verify PHP-FPM is actually listening:
Should show it's listening. If not, restart it:sudo lsof | grep php8.5-fpm.sock
3. Check for SELinux/AppArmor issues:sudo systemctl restart php8.5-fpm sudo systemctl status php8.5-fpm
If SELinux is enabled:sudo aa-status # Check AppArmor getenforce # Check SELinux
4. Double-check nginx error log again:sudo semanage fcontext -a -t httpd_var_run_t "/run/php/php8.5-fpm.sock" sudo restorecon -v /run/php/php8.5-fpm.sock
5. Test PHP-FPM directly:sudo tail -20 /var/log/nginx/error.log
6. Also verify your nginx upstream is correct in config:sudo -u www-data php -v
Should be exactly: server unix:/run/php/php8.5-fpm.sock; ####ปรับ config PHP ####เปลี่ยนค่า session.gc\_probability, date.timezone, post_max_size, upload\_max\_filesizegrep -A2 "upstream" /etc/nginx/sites-enabled/your-site.conf
nano /etc/php/8.3/fpm/php.ini
####แก้ไขค่า php poolsession.gc_probability = 1 date.timezone = Asia/Bangkok post_max_size = 64M upload_max_filesize = 64M
nano /etc/php/8.3/fpm/pool.d/www.conf
Enabling PHP8.3 on Nginx serverpm = dynamic pm.max_children = 600 pm.start_servers = 20 pm.min_spare_servers = 10 pm.max_spare_servers = 30 request_terminate_timeout = 30s pm.max_requests = 500
sudo nano /etc/nginx/sites-available/default
index index.php index.html
...
location ~ \.php$ {
        include snippets/fastcgi-php.conf
        # With php-fpm (or other unix sockets):
        fastcgi_pass unix:/var/run/php/php8.3-fpm.sock;
        # With php-cgi (or other tcp sockets):
        <a class="hashtag" href="/tags/fastcgi">#fastcgi</a>_pass 127.0.0.1:9000;
}
Restart nginxsudo service php8.3-fpm restart
sudo systemctl restart nginx.service
Install phpmyadmin
apt install phpmyadmin
sudo ln -s /usr/share/phpmyadmin /var/www/your_domain/phpmyadmin
Create site config
cd /etc/nginx/sites-available
nano domain.conf
cd /etc/nginx/sites-enabled
ln -s ../sites-available/domain.conf domain.conf
Step 4 - How To Secure Nginx with Let's Encrypt on Ubuntu 22.04
sudo apt remove certbot
sudo snap install core; sudo snap refresh core
sudo snap install --classic certbot
sudo ln -s /snap/bin/certbot /usr/bin/certbot
sudo certbot
กรณีมีปัญหาในการติดตั้งผ่าน snap ไม่ได้ สามารถติดตั้งโดยตรงได้จาก Certbot Instructions
ติดตั้ง SSL Certificate Filde วิธีการติดตั้ง SSL Certificate บน Nginx Server
Step 5 – ขั้นตอนสุดทัาย - Check List
config PHP
Then changesudo nano /etc/php/8.3/fpm/php.ini
Then restart phpdate.timezone = Asia/Bangkok
sudo service php8.3-fpm restart
It sets the maximum allowed size of the client request body, specified in the “Content-Length” request header field. Here’s an example of increasing the limit to 50MB in /etc/nginx/nginx.conf file. Set in http block which affects all server blocks (virtual hosts).
nano /etc/nginx/nginx.conf
http {
    ...
    client_max_body_size 50M;
}
nano /etc/nginx/sites-available/domain.conf
server {
    ...
    client_max_body_size 50M;
}
location /uploads {
    ...
    client_max_body_size 50M;
}<br />
systemctl restart nginx
Old version
ถอนการติดตั้ง
หากมีการติดตั้ง apache2 ไว้ก่อน สามารถถอนการติดตั้งด้วย
apt-get purge apache2
apt-get autoremove
กรณีการอัพเกรดจาก Apache มีขั้นตอนของการตรวจสอบ และ ถอดโปรแกรม
uname -a
Linux alumni 5.4.0-167-generic <a class="hashtag" href="/tags/184">#184</a>-Ubuntu SMP Tue Oct 31 09:21:49 UTC 2023 x86_64 x86_64 x86_64 GNU/Linux

lsb_release -a
No LSB modules are available.
Distributor ID: Ubuntu
Description:    Ubuntu 20.04.1 LTS
Release:    20.04

apachectl -v
Server version: Apache/2.4.41 (Ubuntu)
Server built:   2023-10-26T13:54:09

php -v
PHP 7.4.3-4ubuntu2.20 (cli) (built: Feb 21 2024 13:54:34) ( NTS )
Copyright (c) The PHP Group
Zend Engine v3.4.0, Copyright (c) Zend Technologies
    with Zend OPcache v7.4.3-4ubuntu2.20, Copyright (c), by Zend Technologies

mysql --version
mysql  Ver 15.1 Distrib 10.3.39-MariaDB, for debian-linux-gnu (x86_64) using readline 5.2

<a class="hashtag" href="/tags/apt">#apt</a> update
<a class="hashtag" href="/tags/apt">#apt</a> list --upgradable<br />
<br />
<br />
add-apt-repository ppa:ondrej/apache2
apt update
apt upgrade

do-release-upgrade

ssh recovery port 1022
server {
    ...
    listen 443 ssl; # managed by manual
    ssl_certificate    /etc/ssl/certs/filename.crt;
    ssl_certificate_key    /etc/ssl/certs/filename.key;
    # ssl_certificate_chain /etc/ssl/filename.chain
}
sudo add-apt-repository universe
sudo apt install php-fpm php-mysql
sudo apt install php8.1-mbstring
sudo apt install php8.1-gd

php --version
which php
whereis php
sudo nano /etc/nginx/sites-available/your_domain
/etc/nginx/sites-available/your_domain
server {
        listen 80;
        root /var/www/html;
        index index.php index.html index.htm index.nginx-debian.html;
        servername yourdomain;

    location / {
           try_files $uri $uri/ /index.php?$uri&$args;
           # try_files $uri $uri/ =404;
    }

    location ~ \.php$ {
            include snippets/fastcgi-php.conf;
            fastcgi_pass unix:/var/run/php/php7.2-fpm.sock;
    }

    location ~ /\.ht {
            deny all;
    }


}
ที่มา
กำลังศึกษาวิธีการจัดการ light/dark mode เพิ่งเริ่ม เดี๋ยวค่อยกลับมาเขียนต่อ
keyword: force for darkmode using prefers-color-scheme: dark
ที่มา
กำลังเปลี่ยน Class MyDb() ของเดิมเป็น Class SoftganzDB() ของใหม่ และเปลี่ยนมาใช้ PDO แทน mysqli
ที่มา
เดิมเคยเก็บโดยการแปลงด้วยคำสั่ง jsonencode แต่มักจะเกิดปัญหาเมื่อมีอักขระบางตัวหรือการขึ้นบรรทัดใหม่ ซึ่งจะทำให้ไม่สามารถแปลงกลับด้วยคำสั่ง jsondecode
แต่....
MySQL version 5.7.8 ได้เพิ่ม JSON data type ให้แล้ว (แม้ว่าเมื่อเลือกเป็น JSON data type แล้ว MySQL ก็จะเก็บเป็น longtext type ก็ตาม)
และมีคำสั่งเฉพาะในการจัดการกับข้อมูล เช่น
JSONOBJECT,
JSONARRAY,
JSONMERGEPRESERVE,
 JSONMERGEPATCH,
 JSONTYPE,
 JSONEXTRACT,
 JSONINSERT,
 JSONREPLACE,
 JSONSET,
 JSONREMOVE
JSON-SET:
UPDATEiotSETdataJson= JSON-SET(dataJson, "$.test", "1" ) WHEREnodeDataId=3
JSON-REPLACE จะบันทึกค่าทับของเดิม แต่หากของเดิมไม่เคยมี key นั้นอยู่ ก็จะไม่มีการบันทึกข้อมูลใหม่ลงไป
JSON-SET จะบันทึกข้อมูลทับของเดิม หากยังไม่เคยมี key นั้นอยู่ ก็จะสร้างเพิ่มให้โดยอัตโนมัติ
ลองดูรายละเอียดได้จาก How To Work with JSON in MySQL
ที่มา
Intro: / A E / A D / A E / B A /
    A              E     F#m       A
วันเวลาหมุนเปลี่ยนเวียนไป สุขสดใสไม่เคยเดินตาม
    A              E      F#m        A
วันเวลาหมุนเปลี่ยนโมงยาม ต่างทับถมแต่ความทุกข์ทน
    A           E        F#m        E
ในเวลาหนาวเปลี่ยวกมล เอาความฝันของฉันต่อเติม
    A          F#m  D          A       E     A
ตามเวลาได้มาช่วยเสริม สานเป็นความสดใส ไม่มากมายให้แค่มี
Instru / A E / B7 A /
      A            E       F#m       A
มีความหวังเป็นทางสร้างธรรม มีความช้ำเป็นกำลังใจ
       A       E        F#m       A
เอาความจริงที่แตกสลาย ใส่เบ้าหลอมรวมเป็นพลัง
        A           E       F#m       E
เอาความเลวที่เกาะเกรอะกรัง กลั่นมันทิ้งกินเป็นตะกอน
     A         F#m       D        A       E     A
เอาน้ำตาที่เคยเปียกหมอน ไปราดรดร่างคนรุ่มร้อน ให้ชุ่มเย็น ไม่ย่ำยี
   D      E       A      F#m  D     E    A         F#m
* ฝันนั้นล่องลอย ดุจหิ่งห้อยแสงริบหรี่   ฝันนั้นยังมีสิ่งสดใสในคืนเดือนดับ
 D      E       A    F#m   D        E      A      F#m
รอตะวันรุ่งราง จะลาลับไม่รบกวน ยามคุณร้าวรัญจวน ก็จะหวนแสงหิ่งห้อย
 D      E         A
ร้อยเรื่องราวในคืนข้างแรม
Instru / A E / F#m A / A E / F#m E / A F#m / D A / B7 A /
( * , * )
Outro / A E / A D / A E / B7 A /
[Intro] / G / G / Bm / G / A Bm / Bm / Bm /
Bm                        D          Bm
ไกลโอ้ไกลจากโพ้นขอบฟ้า เราจากมาด้วยการก้าวย่าง
       D         Bm        G         A7
จากกลิ่นฟางรอยยิ้มเจ้าเอย ใครเล่าเคย ใครเล่าเคย
     D         Bm
พี่น้องเอ๋ย จะเล่าให้ฟัง
[Instru] / G / Bm / Bm / Bm / D / Bm / Bm /
     Bm
ตามทิวเขาที่ยาวเหยียดฟ้า ตามหมู่ปลาลำธารใสสด
     D       Bm        G      A7
ตามหมู่มดที่รังเลิศงาม ไปจากหลัง ใจฝากฝัง
      D
ฝากเจ้าไว้ ในแผ่นดิน
[Instru] / Bm / (6 Times)
      Bm                                    D        Bm
ดินเคยนอนสะท้อนอุ่นกาย มองยอดไม้เมื่อยามแรกผลิ ผลิกิ่งรวงเป็นพวงพุ่มไม้
                                       D           Bm
น้ำที่ไหลหลั่งลงจากดอย ใจเจ้าลอยไปสู่ท้องทุ่ง มุ่งสู่เมืองเฟื่องฟุ้งแปลกตา
                                                 D       Bm
เจ้าเคยยิ้มเคยแย้มเบิกบาน สนุกสนานท่ามกลางผองเพื่อน เคยพูดเตือนและสนทนา
                                  D         Bm
เจ้าเคยฝันถึงวันที่ดี มาบัดนี้มิอาจพบหน้า ดูใกล้ตา แต่แล้วไกลตีน
       G         A7          D       Bm
แผ่นดินที่หอม แผ่นดินที่ตรอม จะกอดเจ้าไว้ ยังไออุ่นกัน
                                    D        Bm
รักเจ้าไว้ยังไออุ่นกัน ฝันและฝันให้ไกลที่สุด เจ้ามนุษย์จะหวังสิ่งใด
                                    D        Bm
รักเจ้าไว้ยังไออุ่นกัน ฝันและฝันให้ไกลที่สุด เจ้ามนุษย์จะหวังสิ่งใด
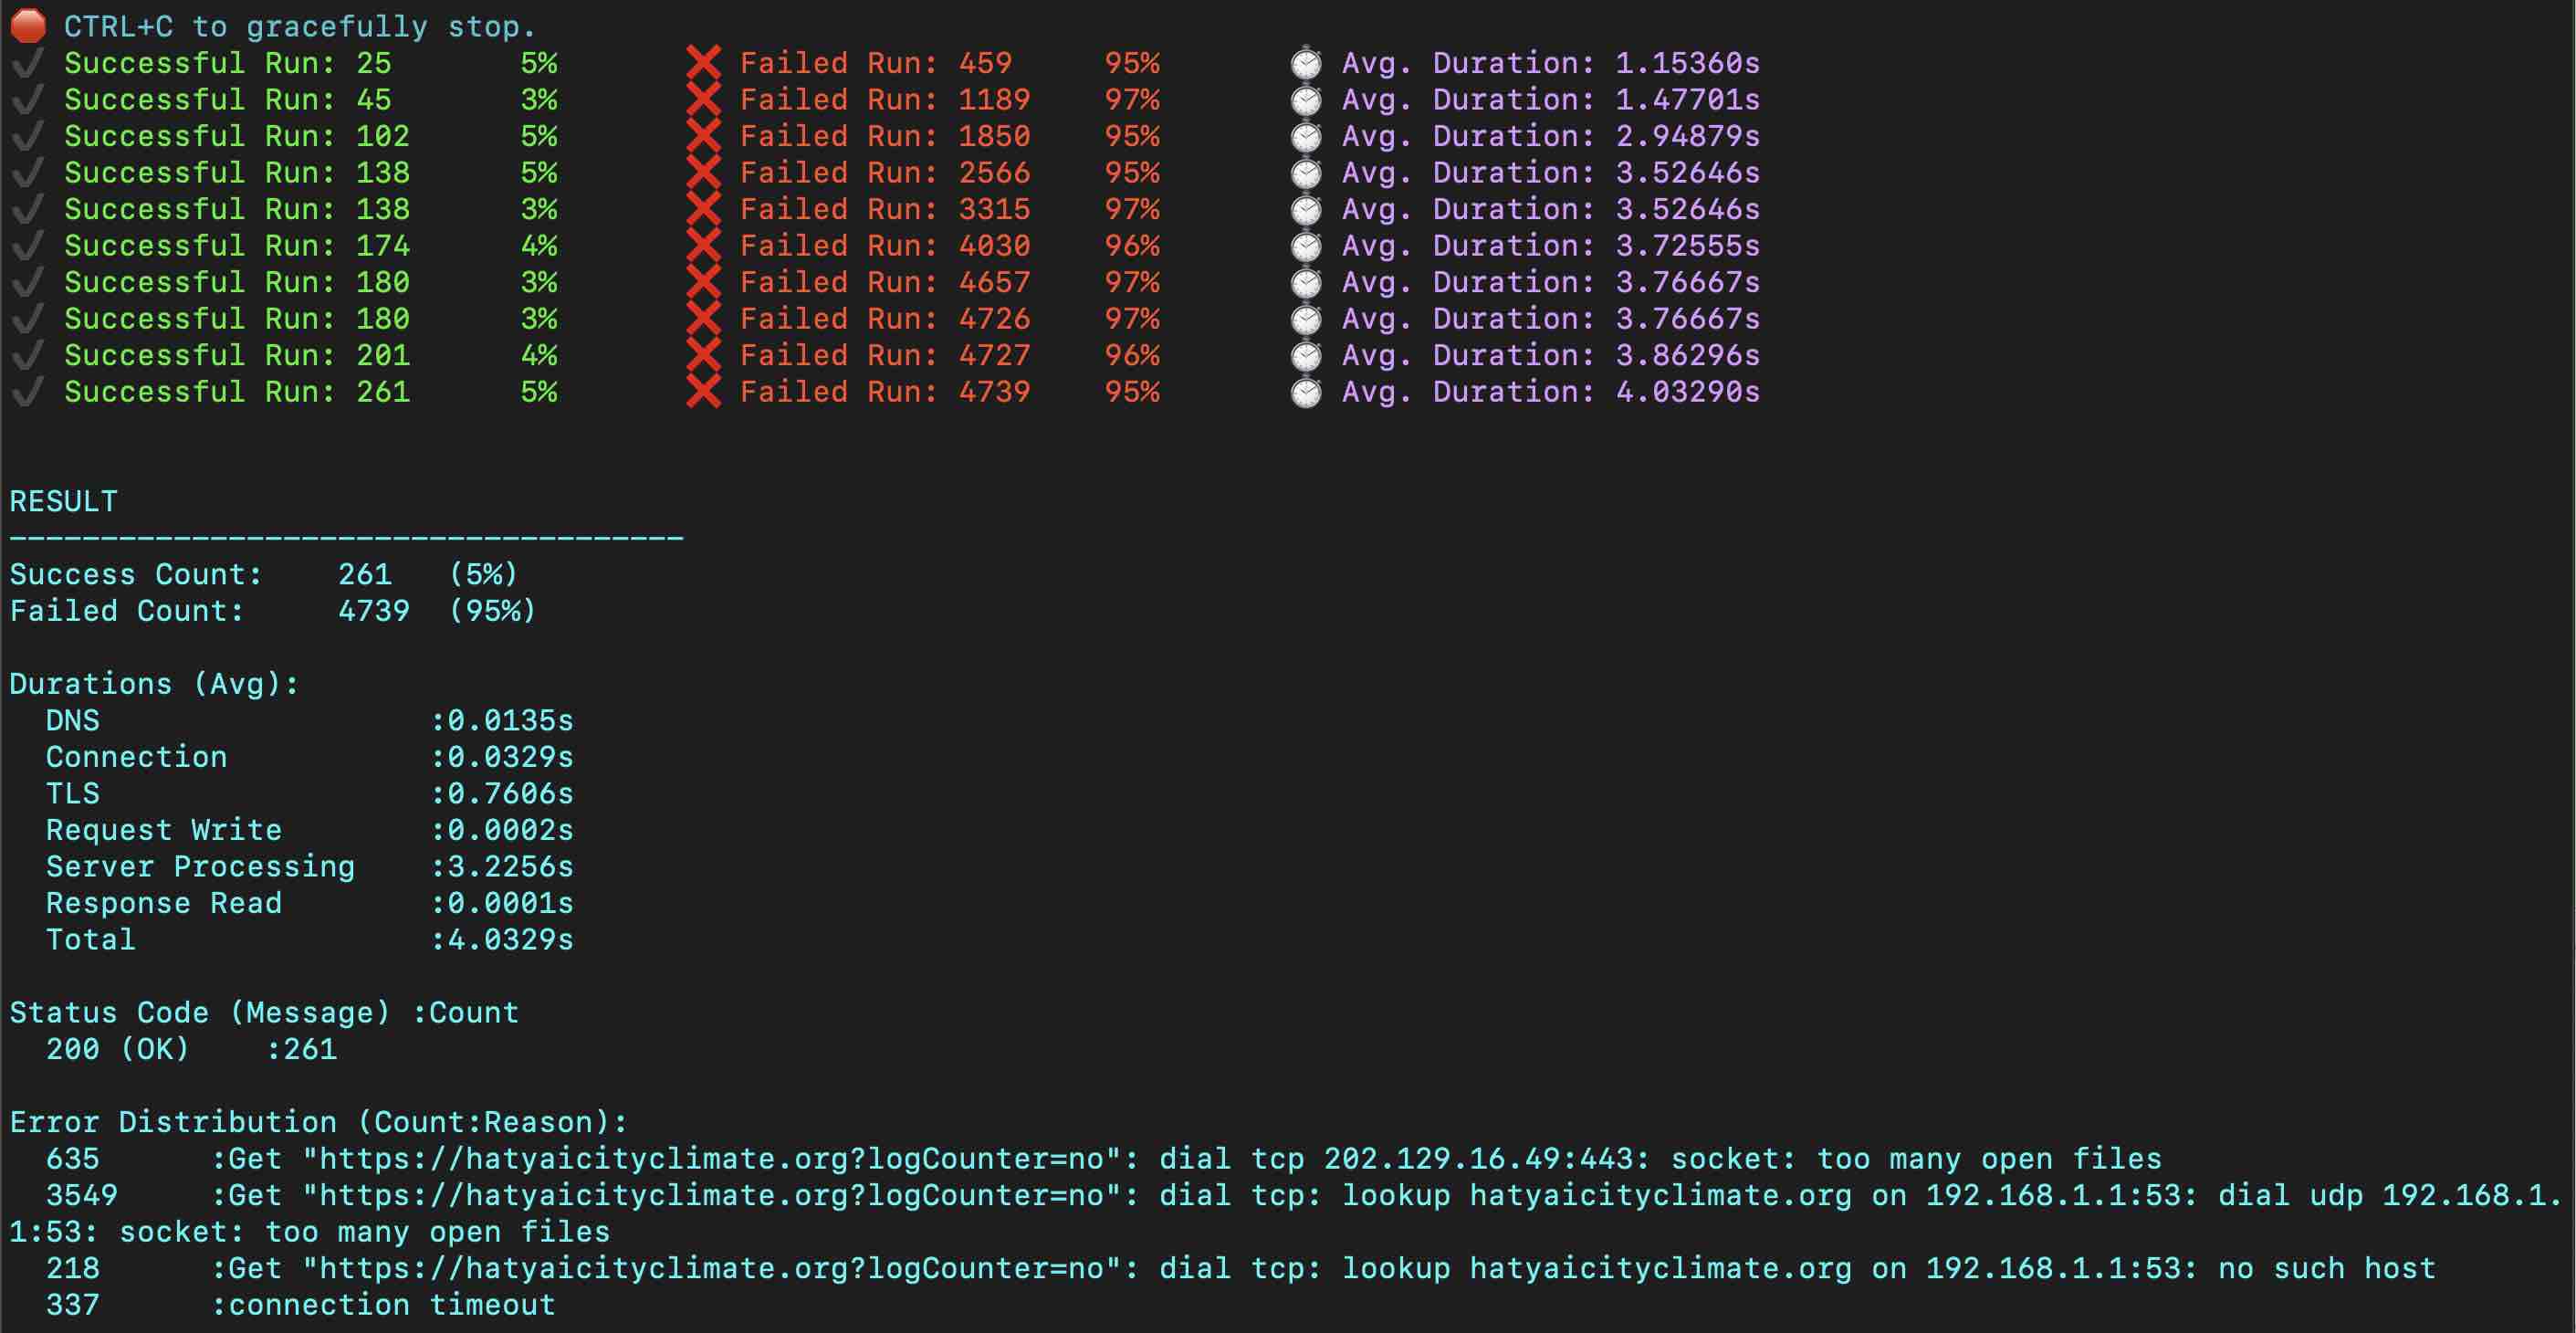
ทดลองทำ Load Test กับ server
ddosify -t "http://localhost/seti/softganz.com?logCounter=no" -m GET -n 5000 -d 60 -T 10
ผล ไม่ผ่าน
RESULT
Success Count: 261 (5%)
Failed Count: 4739 (95%)