หลังจากติดตั้ง Flutter บน Macbook M1 pro ก็เกิดอาการ Exception: Error running pod install ตอนสั่ง flutter run บน iOS
ทางแก้ที่ลองแล้ว work คือ
1.Run คำสั่งในครั้งแรก (ครั้งเดียว)
sudo arch -x86_64 gem install ffi
2.ติดตั้ง pods
cd Project/ios
arch -x86_64 pod install
จากคำสั่ง ดูเหมือนจะเป็นการติดตั้ง x86 แต่มันสามารถใช้งานได้ เลยไม่แน่ใจเหมือนกันว่าเป็นวิธีการแก้ปัญหาที่ถูกต้องไหม
ที่มา:
เพิ่งลองเอามาเล่นดู จากปัญหาเมื่อเปิดเครื่องกลับจาก sleep บางครั้ง app จะถูกย้ายจาก extend display มากองรวมกันอยู่ที่หน้าจอของ laptop display ต้องมาเสียเวลาลากแต่ app ไปยังตำแหน่งประจำ
Hammerspoon สามารถทำเรื่องนี้ได้ แต่ต้องเขียนโปรแกรม ลองดูอยู่เป็นชั่วโมง ก็สามารถทำอะไรได้หลายอย่าง ลองดูจาก Getting Started with Hammerspoon
ได้มาประมาณนี้ แต่ยังไม่ work ตามที่ต้องการ คงต้องเขียนอีกเยอะ
hs.hotkey.bind({"cmd", "alt", "ctrl"}, "R", function()
    hs.reload()
end)

function reloadConfig(files)
    doReload = false
    for _,file in pairs(files) do
        if file:sub(-4) == ".lua" then
            doReload = true
        end
    end
    if doReload then
        hs.reload()
    end
end
myWatcher = hs.pathwatcher.new(os.getenv("HOME") .. "/.hammerspoon/", reloadConfig):start()
hs.alert.show("HammerSpoon config loaded")

hs.application.enableSpotlightForNameSearches(true)
local laptopScreen = "Built-in Retina Display"
local BenQScreen = "BenQ EW3270U"
local DellScreen = "S2718H/HX"
local windowLayout = {
    {"Safari",  nil,  BenQScreen, nil, nil, hs.geometry.rect(1800, 0, 1000, 1400)},
    {nil,  "LINE",    BenQScreen, nil, nil, hs.geometry.rect(1800, 1430, 800, 800)},
    {"ForkLift",  nil,    BenQScreen, nil, nil, hs.geometry.rect(2500, 1200, 1600, 980)},
    {nil,"Users", BenQScreen, hs.layout.right50, nil, nil},
    -- {"Google Chrome", nil,         BenQScreen, nil, nil, hs.geometry.rect(2200, 0, 1000, 1400)},
}
hs.layout.apply(windowLayout)

print("APPLICATION " , hs.application.frontmostApplication())
print(hs.window.focusedWindow():application():title())
สรุป ณ ตอนนี้คือ ติดตั้ง โปรแกรม Stay มาใช้งานไปก่อน
ที่มา:
Update: ยังติดตั้งไม่สำเร็จ
Update: ลอง copy meld จาก folder Application ของเครื่องเดิม มาไว้ใน folder Application เครื่องใหม่ ผลคือใช้งานได้เฉยเลย (แต่ทำหลังจากได้ติดตั้งตามขั้นตอนด้านล่างเรียบร้อยแล้ว เลยไม่รู้ว่าถ้า copy มาเลยโดยไม่ต้องทำตามขั้นตอนด้านล่าง จะ work ไหม?)
Meld เป็นเครื่องมือสำหรับตรวจสอบความแตกต่างของข้อความใน text file สามารถเปรียบเทียบความแตกต่างระหว่าง 2 หรือ 3 ไฟล์ ได้ในครั้งเดียว สามารถเปรียบเทียบระหว่าง 2 หรือ 3 folder ได้
ดูรายละเอียดเพิ่มเติมได้จาก https://meldmerge.org/
ก่อนติดตั้ง จะต้องทำการติดตั้ง MacPorts ให้เรียบร้อยก่อน แล้วจึงเริ่มติดตั้งผ่าน macOS terminal
sudo port install meld
ดูว่าไฟล์อะไรบ้างที่ถูกติดตั้งโดย meld
port contents meld
ตั้งค่าให้ meld upgrade อัตโนมัติ
sudo port selfupdate && sudo port upgrade meld
ที่มา:
(แปะไว้ก่อน) Update 1: ยัง connect ไม่สำเร็จ แต่ติดตั้ง VPS ด้วย VPN Client ปกติของ macOS ตามขั้นตอนในคู่มือ ก็สามารถใช้งานได้ไปก่อน
Download the FortiClient VPN installer with the link of Mac Installer Link
.
Set up PSU-ม.อ.
- การติดตั้งใช้งาน VPN - VPN Installation
- ขั้นตอนการติดตั้ง SSL VPN Client สําหรับเครื่องผู้ใช้ที่เป็น Mac OS X
- VPN for MacOS
- คู่มือติดตั้ง VPS Client บน macOS ด้วย version เก่า
ที่มา:

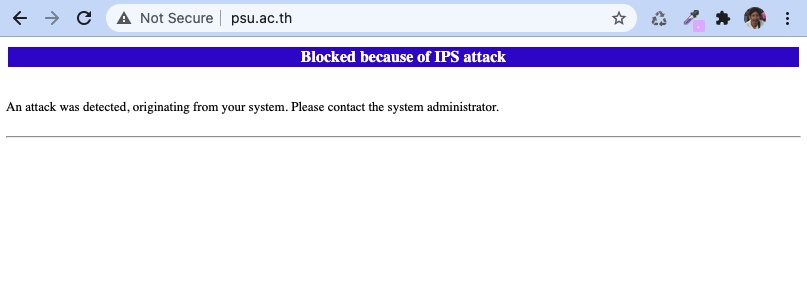
โดนบ่อย คือ เปิดเข้าเว็บที่ server อยู่ภายใน ม.อ. หาดใหญ่ไม่ได้ เข้า VPN ก็ไม่ได้ ยังหาสาเหตุไม่เจอ แต่พอเปลี่ยน wifi ไปใช้ตัวอื่น (เช่นใช้ hotspot ของมือถือ) ก็สามารถใช้งานได้
Error ตามนี้
Blocked because of IPS attack

An attack was detected, originating from your system. Please contact the system administrator.
เดี๋ยวค่อยมาเขียนรายละเอียด
Install Apache
Location of Apache config file is /opt/homebrew/etc/httpd/httpd.conf Change www home folder
mv /opt/homebrew/var/www /opt/homebrew/var/www.bak
ln -s /Users/httpdocs /opt/homebrew/var/www
brew services restart apache2
brew tap shivammathur/php
เลือกมาสักเวอร์ชั่น
brew install shivammathur/php/php@5.6
brew install shivammathur/php/php@7.0
brew install shivammathur/php/php@7.1
brew install shivammathur/php/php@7.2
brew install shivammathur/php/php@7.3
brew install shivammathur/php/php@7.4
brew install shivammathur/php/php@8.0
brew install shivammathur/php/php@8.1
brew install shivammathur/php/php@8.2
Mac M1 : Config file อยู่ที่
/opt/homebrew/etc/php/7.0/php.ini
/opt/homebrew/etc/php/7.1/php.ini
/opt/homebrew/etc/php/7.2/php.ini
/opt/homebrew/etc/php/7.3/php.ini
/opt/homebrew/etc/php/7.4/php.ini
/opt/homebrew/etc/php/8.0/php.ini
/opt/homebrew/etc/php/8.1/php.ini
/opt/homebrew/etc/php/8.2/php.ini
Mac Intel : Config file อยู่ที่
/usr/local/etc/php/5.6/php.ini
/usr/local/etc/php/7.0/php.ini
/usr/local/etc/php/7.1/php.ini
/usr/local/etc/php/7.2/php.ini
/usr/local/etc/php/7.3/php.ini
/usr/local/etc/php/7.4/php.ini
/usr/local/etc/php/8.0/php.ini
ผลลัพท์ตอนติดตั้ง
To enable PHP in Apache add the following to httpd.conf and restart Apache:
    LoadModule php7_module /usr/local/opt/php@7.4/lib/httpd/modules/libphp7.so

<FilesMatch .php$>
    SetHandler application/x-httpd-php
</FilesMatch>


Finally, check DirectoryIndex includes index.php
    DirectoryIndex index.php index.html

The php.ini and php-fpm.ini file can be found in:
    /usr/local/etc/php/7.4/

php@7.4 is keg-only, which means it was not symlinked into /usr/local,
because this is an alternate version of another formula.

If you need to have php@7.4 first in your PATH, run:
  echo 'export PATH="/usr/local/opt/php@7.4/bin:$PATH"' >> ~/.zshrc
  echo 'export PATH="/usr/local/opt/php@7.4/sbin:$PATH"' >> ~/.zshrc

For compilers to find php@7.4 you may need to set:
  export LDFLAGS="-L/usr/local/opt/php@7.4/lib"
  export CPPFLAGS="-I/usr/local/opt/php@7.4/include"<br />
<br />
<br />
To start shivammathur/php/php@7.4:
  brew services start shivammathur/php/php@7.4
Or, if you don't want/need a background service you can just run:
  /usr/local/opt/php@7.4/sbin/php-fpm --nodaemonize
เปลี่ยนลิงก์
brew unlink php && brew link --overwrite --force php@7.4
Apache
แก้ไขไฟล์ /opt/homebrew/etc/httpd/httpd.conf /etc/apache2/httpd.conf หรือ /usr/local/etc/httpd/httpd.conf file scroll to the bottom of the LoadModule entries.
 LoadModule php5_module /usr/local/opt/php@5.6/lib/httpd/modules/libphp5.so
 <a class="hashtag" href="/tags/LoadModule">#LoadModule</a> php7_module /usr/local/opt/php@7.0/lib/httpd/modules/libphp7.so
 <a class="hashtag" href="/tags/LoadModule">#LoadModule</a> php7_module /usr/local/opt/php@7.1/lib/httpd/modules/libphp7.so
 <a class="hashtag" href="/tags/LoadModule">#LoadModule</a> php7_module /usr/local/opt/php@7.2/lib/httpd/modules/libphp7.so
 <a class="hashtag" href="/tags/LoadModule">#LoadModule</a> php7_module /usr/local/opt/php@7.3/lib/httpd/modules/libphp7.so
 <a class="hashtag" href="/tags/LoadModule">#LoadModule</a> php7_module /usr/local/opt/php@7.4/lib/httpd/modules/libphp7.so
 <a class="hashtag" href="/tags/LoadModule">#LoadModule</a> php_module /usr/local/opt/php@8.0/lib/httpd/modules/libphp.so
 <a class="hashtag" href="/tags/LoadModule">#LoadModule</a> php_module /usr/local/opt/php@8.1/lib/httpd/modules/libphp.so
ใช้ sphp เป็นตัวเปลี่ยน version จะสะดวกกว่า
curl -L https://gist.githubusercontent.com/rhukster/f4c04f1bf59e0b74e335ee5d186a98e2/raw/adc8c149876bff14a33e3ac351588fdbe8172c07/sphp.sh > /opt/homebrew/bin/sphp
chmod +x /opt/homebrew/bin/sphp
sphp 8.1
Install MariaDB
brew install mariadb
Restart MariaDB
Auto start
brew services start mariadb
Manual start
mysql.server restart
Location of database is /opt/homebrew/var/mysql, If you want to change use symbolic link to new location
brew services stop mariadb
cp -R /opt/homebrew/var/mysql /Users/mysql
mv /opt/homebrew/var/mysql /opt/homebrew/var/mysql.bak
mkdir /opt/homebrew/var/mysql
ln -s /Users/mysql /opt/homebrew/var/mysql
brew services start mariadb
MariaDB Configuration
แก้ไขไฟล์ /opt/homebrew/etc/my.cnf.d/my.cnf
[mysqld]
sqlmode="NOFIELDOPTIONS"
  # Avaliable Mode<br />
  # "NOFIELDOPTIONS,IGORESPACE,NOZEROINDATE,NOZERODATE,ERRORFORDIVISIONBYZERO,NOAUTOCREATEUSER,NOENGINESUBSTITUTION"
default-storage-engine = MYISAM
character-set-server = utf8
  <a class="hashtag" href="/tags/collation">#collation</a>-server = utf32unicodeci
หากไม่ต้องการให้ตรวจสอบการบันทึกข้อมูลของฟิลด์ เช่น ข้อมูลยาวเกินกว่าที่กำหนดในฟิลด์ ให้กำหนด mode เป็น NOFIELDOPTIONS
ที่มา

มี 2 วิธี
- QuickTime
- Reflector with Airplay
พอดีว่าใช้ iPad Air 2020 แต่ Macbook Pro เป็นรุ่นปี 2015 ซึ่งยังหาวิธีเชื่อมต่อผ่าน Airplay ยังไม่ได้
เลยลอง mirror ผ่าน QuickTime ดู
ขั้นตอนในการ Mirroring With QuickTime
จำเป็นต้องใช้สาย cable ต่อผ่าน USB ของ Mac กับ iPad
เปิด QuickTime บน Mac ก่อน แล้วเลือกเมนู File แล้วเลือก New Movie Recording
จะแสดงหน้าต่างสำหรับบันทึก Movie โดยค่า default จะถูกกำหนดให้เป็นกล้อง
เปลี่ยนให้เป็น iOS device โดยคลิกที่ปุ่มลูกศรลงถัดจากปุ่มบันทึก (record button) แล้วเลือก iOS device จากรายการกล้องที่แสดง
แค่นี้เอง หน้าจอของ iPad ก็จะมีอยู่บนหน้าจอของ Mac เรียบร้อย
ข้อเสียคือต้องต่อสาย USB ระหว่าง Mac กับ iPad ซึ่งอาจจะไม่สะดวกในการใช้งานในบางสถานการณ์
กำลังหาข้อมูลเกี่ยวกับการ build app with signed เพื่อส่งขึ้น Play Store
ทำตามขั้นตอนในเว็บ flutter.dev
ถ้ายังไม่มี java หรือ error ให้ลอง openjdk ก่อน
brew install openjdk
export JAVA_HOME="/opt/homebrew/opt/openjdk/libexec/openjdk.jdk/Contents/Home"
java --version
สร้าง key : ถ้ายังไม่มีการสร้างไฟล์ .jks ให้สร้างขึ้นมาก่อน
ดูข้อมูลในไฟล์ .jkskeytool -genkey -v -keystore /Users/name/appname.jks -keyalg RSA -keysize 2048 -validity 10000 -alias release
ดูข้อมูลในไฟล์ .apkkeytool -v -list -keystore appname.jks
keytool -printcert -jarfile appname.apk
#กำหนดการ keystore ไว้ใน app สร้างไฟล์ [project]/android/key.properties แล้ว copy code ด้านล่างไปใส่
storePassword=<password from previous step>
keyPassword=<password from previous step>
keyAlias=upload
storeFile=<location of the key store file, such as /Users/<user name>/upload-keystore.jks>
คำเตือน เก็บรักษาไฟล์ key.properties ไว้ให้ดี อย่างส่งขึ้น git เด็ดขาด
กำหนดค่าเพื่อ signing ใน gradle
1.แก้ไขไฟล์ [project]/android/app/build.gradle
   def keystoreProperties = new Properties()
   def keystorePropertiesFile = rootProject.file('key.properties')
   if (keystorePropertiesFile.exists()) {
       keystoreProperties.load(new FileInputStream(keystorePropertiesFile))
   }

android {
         ...
   }
2.หา buildTypes
   buildTypes {
       release {
           // TODO: Add your own signing config for the release build.
           // Signing with the debug keys for now,
           // so flutter run --release works.
           signingConfig signingConfigs.debug
       }
   }
signingConfigs {
       release {
           keyAlias keystoreProperties['keyAlias']
           keyPassword keystoreProperties['keyPassword']
           storeFile keystoreProperties['storeFile'] ? file(keystoreProperties['storeFile']) : null
           storePassword keystoreProperties['storePassword']
       }
   }
   buildTypes {
       release {
           signingConfig signingConfigs.release
       }
   }
Build
flutter build appbundle
ผลลัพท์ของการ build จะอยู่ที่
build/app/outputs/bundle/release/app-release.aab
ติดขั้นตอนอัพโหลดขึ้น play store
"Your Android App Bundle is signed with the wrong key. Ensure that your App Bundle is signed with the correct signing key and try again. Your App Bundle is expected to be signed with the certificate with fingerprint"
ลองหาทางแก้ไข ก็ไม่หาย แต่พอลองอัพหลายครั้ง ก็ยังขึ้น error แต่ปุ่มให้ SAVE สามารถใช้งานได้ ก็เลยผ่าน
ลองอัพ version ใหม่ ปรากฎว่า ไม่ขึ้น error
ที่มา:
